| InstallScript is an extremely easy, yet
powerful
tool for installing your applications. It is a simple scripting
language,
together with a simple 'wizard' (ISbuilder)
to allow you to set up your installation packages simply by dragging
files
onto ISbuilder. When the InstallScript application itself is running,
it
appears like any normal windows application - not a console application
- it displays a window, whose contents are under the control of the
running
script.
InstallScript is ideal for distributing
software
to third parties or within your own organization. It is designed to
work
with SXAzip, Octatec's Self eXtracting
Archive
generation program (if you buy
InstallScript, the the SXAxip package is automatically
included,
free
of charge). InstallScript has built-in
support for SMS.
Install script is a very powerful tool
and specifically
addresses the problems of replacing
busy
DLLs and EXEs and replacing
Shared
Objects. It also has the ability to perform many complex
configuration
tasks via simple commands such as enabling
services, adding ODBC data souces and configuring
access remote DCOM objects.
QUICK
START: The language is
fully
documented bellow, but, if you're in a hurry, skip to the
ISbuilder
section, and begin building Installation Packages straight away.
Hopefully
you will find ISbuilder intuitive and extremely easy to use, much more
so than similar products.
You can go straight to the ISBuilderTutorial
Section to see just how easy it realy is!
Contents
InstallScript Language
The Install Script language has the
following commands.
However, if you don't wish to learn the language immediately, you can
use
ISbuilder,
which automatically creates an InstallScript and SXAzip archive simply
by dragging and dropping.
The general syntax of a command is a
follows
command_name [-options] "argument1"
"argument2"...
It is good practice to put double quotes
round
arguments - if this is done, arguments can contain spaces, if this is
not
done spaces deliminate arguments, and commands that expect a specific
number
of arguments will see more and generate errors. E.G. title
test_message
is OK, but title test message would generate an error
because
the title command requires one argument only, title
"test message" is OK because the double quotes groups the
strings
together into one argument; this is the only significance of double
quotes.
Commands may be split over multiple lines in the script file by
terminating
each line with a backslash, \, but note: the backslash must
be the last character of the line.
Starting InstallScript
If you are developing a script by hand
(i.e. not
using ISbuilder), start InstallScript from
the
Start/Programs/InstallScript
menu. When InstallScript starts, it will look for a script called
"install.txt",
and if it finds it, it will run it. If it doesn't find "install.txt",
you
will be prompted to enter a script filename. Alternatively, you can
start
InstallScript from a command prompt and pass the name of a script file
on the command line, e.g. "InstallScript my_script.txt". If
InstallScript
is being started from an SXAzip Self eXtracting
Archive,
you will not be able to pass a script-file name on the command line,
you
must ensure your script is saved in the archive with the name "install.txt"
(Isbuilder
will manage such requirements for you).
When InstallScript gets
a file from the FileDialog, it will change directory to that of the
file
you enter - this is intended to make development of scripts easier,
since
normally, (and almost certainly if you are using SXAzip as the
distribution
archive) InstallScript will run in the same directory as the
install-script
file, also, the last InstallScript Entered in this way is remembered. (But
Note: no directory change is performed if you pass an install-script on
the command line)
You may pass a /sms directive on the
command line
to InstallScript if you require SMS support.
If you are using ISbuilder to develop
your installation
package, you can run InstallScript from the tools menu to test your
installation.
Important note: InstallScript is case sensitive! However,
if you
use ISbuilder, you will, for the most part, be insulated from the
InstallScript language. ISbuilder generates an InstallScripot for
you,
it includes sections in which you can enter custimization commands if
you
wish - such sections survive subsequent re-geneartions
Commands that change the main window
display
maximize
This command will maximize the
window.
background colour_ref
where
colour_ref is an RGB
(red/green/blue)
specification,
i.e. 3 numerical values separated by colons.
E.G. To display a black background,
use the command
background
0:0:0, and to display a red background, use the command
background 255:0:0
background -b bitmapfile.bmp
Use this variant of the
background command
to display a bitmap as the background
banner -position
"text message"
"font name" font_size colour_ref
where
-position is one of
-l:
left
justified
-r:
right
justified
-c: centre
justified
"font name" is the name
of a
font face
font_size is the
numerical value
of a point size
colour_ref is an RGB
value specification,
i.e. 3 numerical values separated by colons
E.G. banner -l "TEST Banner"
"Times New
Roman" 120 0:255:0
Banner is used to print message on the
screen,
subsequent banner commands print bellow the last one, you do not need
to
use this command, but if you do it will improve the look of the
installation
title "text message"
The title command sets the
title-bar
of the window
prograss -a avi_specifier
progress -i
[number_of_copy_commands_to_follow]
progress -c
Initialize the progress indicator. If your are using
filegroups,
just specify progress -i with no argument, otherwise
specify
progress -i N, where N is the number
of
copy commands to follow. The progress -c command
removes
the progress indicator.
When the -a form of the command is used, it should
be issued
before any other progress commands as it selects the
AVI
to display on the progress indicator. The avi_specifier
can be a file name containg an AVI, or the value @pistons
for the standard pistons AVI or @files for the
traditional
windows 'moving files' AVI.
Control Commands
set [-e] name "value"
E.G. set VENDOR
"Octatec
Ltd"
The set command is used to define and
assign values
to variables. Variables can be created at any time and are always
global.
Once a variable has been set its value is accessed by preceding the
variable
name with a dollar sign,
E.G. message "The
Product Vendor
is: $VENDOR"
You can set an InstallScript variable with the value
of a Windows
Environment variable; this is done by using the -e
option
and
preceding the value parameter with a percent. Once this is done,
the value can be accessed anywhere within the script by preceeding it
with
a $, e.g....
set -e envPATH %PATH
message "the windows path is: $envPATH"
# NB: a single % only is used to
access the
windows environment variable
Note that the $ is
NOT used when
the variable is being set, and is only used when the value of the
variable
is required!
The following variables are predefined and cannot be changed
| WINDIR |
the windows directory |
| SYSDIR |
the system directory |
| PWD |
the staring directory, this remains constant
throughought te life of the installation
|
| CWD |
the current directory
|
| TEMP |
the system temporary directory |
| VER_MAJ |
the major version of the operating system |
| VER_MIN |
the minor version of the operating system |
| VER_BLD |
the build of the operating system |
| VER_PLATFORM |
the operating system type( win32s =0, windows95,98=1,
windowsNT=2) |
| ADMIN_RIGHTS |
This is TRUE is the current user has administator
rights, it is always
TRUE on win9x systems |
| NEEDS_RE_BOOT |
This is automatically set if the system requires a
reboot to complete
the installation process |
| COPY_TARGET |
This variable contains the pathname of the last file
written to by
the copy command |
| ? |
The exit status of the last program to be executed by
the run command |
| USDATE |
The date in DD/MM/YYYY format |
| UKDATE |
The date in MM/DD/YYYY format |
| IDATE |
The date in YYYYMMDD format, suitable for integer
comparisons |
| TIME |
The time in HH:MM:SS format (24 hour clock is used) |
| ITIME |
The time in HHMMSS format, suitable for integer
comparisons (24 hour
clock is used) |
| USER |
The current user name |
| HOST |
The computer name |
| SMSMODE |
TRUE if in SMS mode |
| SMS_INI_FILE |
The pathname of the SMS ini file, or (empty)
if their is no
SMS ini file |
Four special variables control the behaviour of
InstallScript. Firstly,
if you set NO_UNINSTALL to "1", then
no
automatic uninstall script will be generated, secondly, if you set EXIT_AT_END
to "1", then Install Script will exit once the script
has
completed, otherwise, InstallScript will have to be closed manually
after
the script has completed.
E.G. set EXIT_AT_END 1
Thirdly REPLACE_NEWER
controls
how InstallScript behaves when asked to overwrite a newer file with an
older one. The default behaviour is to ask permission from the user.
This
variable can be set to 1 of 4 string values, the values must be upper
case,
and appear exactly as below. A similar variable, REPLACE_SYS_NEWER
allows different behaviour to be specified when overwriting system
files
(system files are those which reside in $SYSDIR or $WINDIR).
The possible values of REPLACE_NEWER and
REPLACE_SYS_NEWER
are...
| DEFAULT |
Ask permission to copy the file |
| NEVER |
Never replace a newer file with an older file |
| ALWAYS |
Always replace files regardless of age |
| DOUBLE_CHECK |
Prompt as in DEFAULT, then ask again |
E.G set REPLACE_NEWER
"ALWAYS"
E.G set REPLACE_SYS_NEWER
"DOUBLE_CHECK"
NB: If these two variables are set to ALWAYS or NEVER,
they take precedence over any sms response-file
value ). This behaviour is selectable from the preferences
dialog when using ISBuilder.
An important point to realize about
InstallScript variables,
is that their value is simply substituted for the symbol $VARIABLE,
just as it appears in the command, then the command is processed, just
as in Unix shell scripting. Unlike Unix scripting, however, if you try
and use a variable that hasn't been set, an error will be generated.
NOTE: if you are setting the HOME
variable,
you should include a drive letter, however, you will not know in
advance
the assignment of drive letters on other systems. Don't worry; if you
use
a drive letter that doesn't exists, a valid drive letter will be
substituted
when the script runs. A better solution, however is to use a ? instead
of a normal drive letter, the ? is replaced by the drive letter of the
WINDOWS
directory. Note: this substitution only occurs when setting the HOME
variable, however, the WINDOWS drive letter '?' is also
interpreted
by the copy command. Of course, you must allow the user to select the HOME
directory (the directory where the installation is placed) using
the
choosedir
command, but HOME should be set initially to provide a
sensible
default.
setenv NAME VALUE
This command enables you to set a windows environment
variable,
this variable will be available to any processes created by the
run
command (except command.com). This command translates directly to
a call to the WIN32 functions SetEnvironmentVariable().
eval [-d] VAR_NAME = value1 OP
value2
Evaluate a numeric expression; VAR_NAME
is a variable name which receives the result.
OP can be one
of: +
- / * % & | ^
If -d is present value1
and value2 are interpreted as floating point numbers,
and
OP
parameters%
& | and ^ are illegal.
Otherwise
value1
and
value2 are interpreted as integers, if a value
is not
an integer, it will be treated as 0. Without the -d
option,
value can be a hex value, 0xnnnn or an octal value, 0nnnn.
The
result stored in VAR_NAMEis always stored as a decimal
integer (or floating point number) converted to a string.
E.G.
eval X = 32 * 2
message "32squared is $X"eval
eval X = 0xA * 1
message "decimal value of 0xA is
$X"
If you are wondering if you can use
the eval command
to add (or concatenate) 2 strings, the answer is no. There is no
need to have the eval command do this, to concatenate two strings
simple use set placing the strings in double quotes, as in set
VAR_NAME
"STRING1 STRING2"
if STRING_1 OP STRING_2
elseif STRING_1 OP STRING_2
else
endif
Where STRING_1 and
STRING_2 are just strings
And OP is one of
the following
operators
= TRUE
if the 2 strings are the same
!= TRUE
if
the 2 strings are not equal
^ TRUE
is the 1st string appears in the 2nd string
> numerical
greater than
>= numerical
greater than or equal-to
< numerical
less than
<= numerical
less than or equal-to
? file status operator, see
below
Note: if numerical comparisons are being made, the 2 strings
are converted
to numbers and then compared, if a string is not a number, a value of 0
is used for the comparison.
E.G.
if $VENDOR = "Octatec Ltd"
message "the
application
is from Octatec"
else
message "the
application
is from an unknown vendor"
endif
File Status Operator ?
This operator expects STRING_1 to be a
pathname and
STRING_2
to be a state, the path is tested to see if it matches the specified
state,
if it does, the if condition succeeds. The following is a list of valid
states...
exists, directory, readonly, system, 0xXXXXXXXX
In the case of 0xXXXXXXXX the file
attribute word
is checked to see if it contains the given flag, i.e. the following
test
is performed,
((GetFileAttributes(pathname)&0xXXXXXXXX)==0xXXXXXXXX)
E.G.
if "c:\path\myfile" ? exists
message the file exists
endif
NOTE: there are no AND/OR operators
filegroup
[-m]
GN "name for group"
option -m specifies
the group is mandatory. i.e. it
cannot be excluded by using the choosefiles
command
GN is a file group specifier - files
are arranged
into groups by adding a file group specifier to the copy
command, N is a number in the range 0 to 8
"name of group" is the name displayed in the choosefiles
dialog.
If filegroups don't make much sense yet, don't worry, they
are an advanced
feature - many installations will not need them. The purpose of this
command
is to give names to file groups - it works in conjunction with the copy
command and the choosefiles command to enable file groups to
be
either selected or deselected from the installation. It is up to you to
assign files to groups and to decide which groups are mandatory (i.e.
cannot
be deselected from the installation).
filegroup -e | -d GN
This variant of the command can be used to enable
(-e) or disable
(-d) file groups manually
call [-r] comand_file
-r: remove the comand_file after use.
This command switches input to the new command file. All
variables set
in the calling script are available in the called script, and any
variables
set in the called script are still in existence once the script
returns.
You will probably only use the -r option when processing a generated
comand_file
produced by a program you called that observers the return
call convention
return
Return from a called comand_file. This command can be
used
to return early, e.g. from an if condition. If you don't want to return
early you don't need to use a return command, as the script
will
automatically return when the end-of-file is reached.
cancel
Cancel the execution of the current script
run [-wx] "program.exe" "arguments" ...
-w: if this option is
specified,
InstallScript will not wait for the program to terminate.
-x: do not run the
program
if the EXE is reference counted and has a reference count greater than
1.
This is so that the onuninstall command can
be used to un-register EXEs by running them, but only if the object is
not
used by any other system.
This command runs the specified program together with
specified
arguments. Note: if the program or any of the arguments contain
embedded
spaces they should be placed in double quotes. So any program that you
run that process it's command line must be prepared to handle quoted
arguments.
Note: do not place the whole command line, including
arguments in double
quotes, otherwise the system will not be able to correctly identify the
executable to run, e.g.
don't do this: run
"$HOME\ComBridgeService.exe -i"
instead do this: run
"$HOME\ComBridgeService.exe" -i
NB: The exit status of all programs that are waited for is
set into
the special variable $?, if the last program to run was not
waited
for or if no programs have run, $? will have the value "(empty)".
File Access Commands
fwrite -t|-a|-T|-A pathname string [string...]
-t: truncate file before writting
-a: append to file
-T: truncate file before writting, write to the
file
even if it is read-only
-A: append to file, write to the file even if
it is
read-only
The string is written to file identified by
pathname.
If the file doesn't exist it is created. You can use the if
command
and the file status operator ? to test that the file is not
read-only,
alternatively, the -T and -A options
will
temporarily remove the read-only attribute of a file if it has it, so
that
the write can take place regardless.
Upto 4 strings parameters can be present. A
new-line
is always added after the strings have been written.
fread pathname RESULT [linenum]
A line of text is read from the file identified by pathname
and
placed in the variable RESULT, note: do not place a $
in front of RESULT, but use $RESULT
in
subsequent commands. RESULT can, of course, be any
variable
name you wish. You can read any line from the file by specifying a linenum,
if the line doesn't exist you will get a string set to "(eof)",
but no error. The default linenum is 1, line numbers
start
from 1. If the file doesn't exist, you will get get a string set to "(nofile)".
You
can use the if command and the file status operator ?
to
test the existence of the file. Note: lines longer than 256 charachters
will be truncated when read.
fedit [-f] pathname instr outstr [linenum]
This command edits the named file replacing instr
with outstr. All lines are processed, however if linenum
is present, the edit only takes place on that line. The command works
regardless
of any read-only attribute on the file being edited. The -f
option causes the command only to run if the named pathname
exists, i.e. without the -f option, if the pathname
does not exist an error is generated, with -f, no
error
is generated. This command might be useful to 'tweak' local
configuration
files, e.g. to insert the name of the local computer (this is available
in the $HOST variable). Note: lines longer than
1024
charachters will be truncated.
A special mode is available wherebt if instr start with /? then any line that contains instr is fully replaced by
outstr, but only
if outstr does not contain the string "(empty)" anywhere [in this way, instr could be built up by $variables, but if any $variable was 'empty' the substitution would not
be made].
rm [-f] pathname
Remove the named file. The -f option
suppresses
any errors if the pathname doesn't exist.
chmod [-f] pathname attributes
The attributes of the named file are set by this
command. The
attributes
parameter
can be one of...
ro
system
hidden
archive
!ro
!system
!hidden
!archive
0xNNNNNNNN |
make the file read only
mark the file as a system file
mark the file as hidden
mark the file as archive
remove the file read only
remove the system file attribute
remove the hidden attribute
remove the archive attribute
set the attribute to the given bit pattern |
The chmod command can be called
successively to
set a series of attributes. The -f option causes the
command
only to run if the named pathname exists, i.e. without
the -f option, if the pathname does
not
exist an error is generated, with -f, no error is
generated.
cd
directory-path
Change to the specified
directory. You may use cd - to retuen to the
previous directory, or cd $PWD
to return to the startup directory
Dialog Commands
message "message to the user"
Display a message box.
The message command allows up to 4 quoted
arguments,
each one will appear on a different line in the output message box. You
may spread the command over more than one line in the script file by
terminating
each line with a backslash, \, but note: the backslash must
be the last character on the line.
oktoinstall -advise
Firstly, this command checks to
see if
the version you are installing is already installed, then it checks to
see if there are any other versions of the software installed. If no
versions
are installed, the command just asks permission to continue. If it
finds
other versions, the command will cause the installation to cancel
unless
-advise
is set, in which case it will just issue a warning and ask permission
to
continue. You should use this command early in the install script, but
not before you have set the variable APP,
VENDOR,
and VER.
query -y|-o RESULT "question"
where
RESULT is a variable that
is
set with the result, the result will be one of YES, NO, OK, CANCEL
depending on the button clicked..
option -y displays buttons YES
and NO, and option -o displays buttons OK
and
CANCEL.
The query command allows up to 3
quoted arguments,
each one will appears on a different line in the output message box.
You
may spread the command over more than one line in the script file by
terminating
each line with a backslash, \, but note: the backslash must
be the last character on the line.
E.G.
query -y RESULT "display a black
background"
if $RESULT = YES
background 0:0:0
endif
display [-cl] filename ["title"]
-c : cancel mode
-l : licence mode
Where option -c causes
a CANCEL
button to be displayed. Without this option, a
CLOSE
button
only, is displayed.
If the
CANCEL
button is clicked, the installation is automatically cancelled. The -loption
is like the -c option, but in addition, a confirmation
check-box is displayed and must be checked before the OK
button
is accepted. If the
title parameter is present, it is used
as the title of the window displaying the file, if it is omitted, the
title
will be the filename.
This command is typically used for displaying license
agreements or
readme files.
Filename can be a plain text file or a Rich Text Format (RTF)
file, in order to display an RTF file, the extension must
be .RTF.
browse html_file
Browse an html file. The HTML
file is
displayed in a modal browser window.
input RESULT "input_dlg_title"
"prompt_string"
"default_value"
Where
RESULT is a
variable that
will receive the users input
This command is typically used to get an activation key from
a user.
Note, as with all commands, InstallScript will reject this command if
the
number of parameters are not correct (in this case 4 are required). If
you do not want a default value you cannot leave the parameter out, nor
can you specify an empty string, "", as this will be seen as a missing
parameter, you must a least specify a single space, " ", if you do not
want the default-value.
getappkey app_key_id
This command is available if you wish to use
InstallScript's
own application key facilities (you don't
have
to use them, you can use your own application key generation methods if
you wish.) This command requests the user enters an application key,
which
is then validated using InstallScript's own key-validation methodology.
To use this command, you must first use the ISkeyGen
application
to generate a key based on a 3 digit number. You will then supply this
key together with the Installation to the purchaser, who will then be
prompted
for the key by this command. NOTE: the intricacies of setting up key
validation
is automatically handled by ISbuilder. If the
key validates successfully, its value is saved in the variable $APPKEY
for latter use by the setappkey
command.
The getappkey does not save the key into the registry. This
is so the
getappkey command can be used very early in the installation process to
validate the key without saving anything in the registry. Thus, if a
cancellation
happens later, the registry will not have to be cleared up. You should
endeavour to only save registry entries and copy files once the user
can
no longer cancel. (Note: if errors occur, registry entries and files
are
automatically cleaned up, but this is not the case if the installation
is cancelled). NB: ISbuilder will handle
adding
commands to the InstallScript in the correct order.
choosedir
RESULT "prompt
text" "default_directory"
This command displays a
directory dialog,
principally to allow the user to select the value of HOME,
i.e.
an installation directory. E.G.
chosedir HOME "select the
installation
directory" $HOME
The above example sets a new value into HOME,
and
initially displays the current value of HOME as a default.
select RESULT
"dialog_window_heading" "prompt_text"
initial_choice_index "list_of_choices"
Where
initial_choice_index is
the numerical
value of the initial choice, i.e. the initial value of the drop down
list,
the first choice is number 0.
list_of_choices is a
comma separated
list of values, these are used to populate the drop down list
RESULT is a variable that will contain the
choice when
the OK button is pressed. A CANCEL button is
available
from this menu, if it is clicked the installation is automatically
cancelled.
E.G.
select RESULT "Select Installation
Type"
"choose one of..." 0 "default,compact,custom"
if $RESULT = default
call
install_defualt.txt
endif
single_step on|off
This command
is
intended for debugging purposes only. It allows you to single step
through
your command script file. Each command is displayed in a dialog, once
as
it is read in from the file, and once again after all variable
substitution
has been been, then the command is optionally executed. Commands that
are
part of failed if-clauses are still displayed, but you are informed
that
the command will not run. You can set single-step mode on of off
anywhere
in your script file. Another way to debug your scripts is to look in
the
log file, %TEMP%\InstallScript.log.
choosefiles
This command allows for groups
of files
to be chosen for installation. It will typically show a dialog
containing
check boxes specifying groups of files that can be optionally
installed.
As groups are selected or deselected the disk space required is
displayed.
Files are assigned to groups by specifying a group ID in the copy
command
- this is an optional parameter to the copy command and is only
required
if the choosefiles command is going to be used. This is an advanced
command
and will not be needed for most installations. Groups are given a name
by the filegroup command.
Tee use of this command is demonstrated in the Advanced example below
Installation Commands
copy [-qsar]
"source"
"destination" [GN]
This command copies the
source
file to the destination
file.
If
the destination file is in use, it arranges for the file to be copied
the
next time the system is booted. Any directories that don't exists in
the
destination path are created.
The -q option forces the command to ask
permission before
making the copy, without this option the copy command will only prompt
if the "destination" is newer than the "target".
For an explanation of -sar options, see the note on
handling
shared
files bellow.
The copy command is also used to assigned files
to groups. This is an advanced feature and is optional. File groups
are used by the choosefiles
command.
The system scans the installation script once before processing any
commands,
and assigns files to groups. These groups can then be optionally
excluded
from the installation by the choosefiles
dialog command.
Be sure to enclose the source and destination in double
quotes - this
is particularly important if the path names contain embedded spaces
If any file being copied to is in-use, e.g. a shared DLL or
EXE, the
system is automatically configured to perform the copy operation at the
next reboot.
If the copy command is replacing an older file with a newer
one, the
user is warned and given the option not to perform the copy.
The destination should be a full pathname. Mostly, if you
follow standardInstallScript
conventions, it will be made up of the HOME variable,
e.g.
copy newfile.exe $HOME\newfiile.exe
You can, however, specify a pathname in full, in which case you should
take care, since you won't know in advance what drive letter
assignments
are in place on other systems. To get round this, you can use the
WINDOWS
wildcard drive letter, ?. When the script runs ? is replaced with the WINDOWS
drive letter, e.g.
copy newfile.exe ?:\Program
file\MyApp\newfile.exe
NB: the HOME variable will always
contain
a valid drive letter.
A Note on
replacing running
EXEs or in-use DLLs
This is taken care of automatically by InstallScript. It
uses the standard
operating system mechanisms, which differ on Windows9X and WindowsNT /
2000 systems. Due to limitations with the mechanism under Windows9X,
all
copy operations must take place using 8.3 filenames, and the 8.3
filename
will replace your none 8.3 filename - to get round this problem,
when replacing non 8.3 filenames under Windows9X, InstallScript will,
in
addition to the standard rename mechanism, generate a batch file that
will
run at start-up and correct any 8.3 name errors. However, where
possible,
use 8.3 names and avoid this additional installation step.
Further
note, just postponing the copying of busy files until a reboot may not
be sufficient, the whole installation may need to be suspended and
restarted
after a reboot, the restart
command
will achieve this, and ISbuilder
supports
this facility.
A note on
replacing shared
DLLs
These will probably be located in $SYSDIR, but
may not be.
Just use the -sra parameters with the copy command, and your
version
of the file will automatically update the existing file, wherever
it is located on the target system!
The -s option
causes
the file to be treated as a shared file, i.e. it is reference
counted. Without the -s option, InstallScript will
still observer reference counting for files that already have a
reference
count,
but with -s, a new reference count is created for
the
file if one doesn't already exist. Further, when you use -r,
the
"destination"
parameteris
only a hint! The system will search the list of shared files in the
registry,
and if it finds one entry, and one entry only where the filename(not
pathname) matches the filename in the destination,
then destination
is
replaced
with
the pathname from the registry. If a destination is replaced, the value
of variable COPY_TARGET is set to the new
destination,
otherwise it is set to the original destination - COPY_TARGET
is always reset after the copy command runs regardless of any option
flags.
There
is a potential problem here - if you copy a file to the system you may
want to access it after you have copied it, i.e you may want to
register
it or run it, and if the copy command changes the destination you won't
know where it has been copied to. To get round this problem you can
either
use the COPY_TARGET variable or setup an alias.
If you include the -a option, once such a substitution
has taken place, the "destination"
acts
as an alias to the actual location, and so wherever "destination"
appears
in your script, it is replaced by the actual destination, so
that
you can continue and access the file as if it were copied where you
originally
specified - i.e. you don't have to worry about whether the destination
was actually replaced or not! (Alias substitution is completely
transparent,
you can completely ignore it when you write your script.)
Instead of using the -a option, you could do
something like...
copy -sr
some.dll $SYSDIR\some.dll
regdll
$COPY_TARGET
Instead of the -r option, you could do the
following...
locate THE_DLL
$SYSDIR\some.dll
# if the DLL is
listed
as a shared object in the registry,
# its pathname
is written
into $THE_DLL
if $THE_DLL =
"(empty)"
# the file is not listed as shared in the registry
set THE_DLL $SYSDIR\some.dll
endif
copy -s some.dll
$THE_DLL
regdll $THE_DLL
The -a and -r options are implemented to
remove the need
for programing structures like those above, it is up to you which
constructs
you use - the ISbuilder utility uses the -sar
option when dealing with shared files.
Replacing Newer Files with Older Ones
In general, you probably don't want to do this.
InstallScript recognizes
2 classes of files, system and non-system and will behave differently
when
replacing system files and non-system files with older ones. NB: system
files are ones that are copied to $SYSDIR or $WINDIR, your own DLL will
be considered a system file if it is copied to a system directory!
Two system variables
control how InstallScript
reacts when being asked to replace newer files with older ones. $REPLACE_NEWER
controls the replacement of non-system files and $REPLACE_SYS_NEWER
controls the replacement of system files. The variables can take four
possible
values, "ALWAYS", "NEVER", "PROMPT" and "DOUBLE_CHECK" specifying the
action
taken.
restart [-rc] label
[ $CONDITIONAL
]
-r:
restart only if a copy operation can't be completed without a reboot.
-c:
restart only if $CONDITIONAL is "TRUE"
label:
this is a user defined label, any string can be used.
This command will suspend the installation and
arrange for
it to be re-started after a system boot. This command is useful
if
a file could not be copied because it was in use, and it is
actually
needed during the installation. E.G. if you are re-distributing the MFC
DLL, and one of your own DLLs needs methods in the new version during
their
registration process.
NOTE: the restart command cannot appear in an if
statement.
This is due to the complexity of re-starting the script within an if.
However,
you can conditionally restart the script by using the -c
option and the $CONDITIONAL parameter, if $CONDITIONAL
is
set to "TRUE"or"1",
the restart is processed,
otherwise it is not.
Multiple restart commands are permitted, each one should
have a unique
label. The label can be any string. You are, however, unlikely to need
more than one restart. Typically you will use one restart command just
after all files have been copied. ISbuilder
will handle this for you if you choose.
You must be careful not to issue any commands
that will
require uninstall actions before a restart. Uninstall actions
are
not preserved during a restart, E.G. don't register any objects,
don't add any menu commands etc until after the last restart command.
However,
all variables set at the point at which the restart command is
processed
will still be set after the restart.
Once a restart has taken place, the variable $RESTARTED
will contain the label of the restart. If the script has not be
restarted
$RESTART
will have the value "FALSE".
locate LOCATION shared_file_path
This command finds the actual location of the
'shared' filename
in shared_file_path. If the system registry's shared
file
list contains one entry and one entry only whose filename is the
same as that in shared_file_path , then LOCATION
is set to that value, otherwise LOCATION is set to "(empty)".
locateobj [-i|o]
LOCATION object.name
-i: look for an In-Proc object
(i.e.
DLL)
-o: look for an Out-Of-Proc object
(i.e.
EXE)
This command allows you to determine if and object is
already registered
or not. If the object is registered LOCATION will
contain
the path of the DLL or EXE that implements this
object,
otherwise LOCATION will have the value "(empty)".
setappkey
The setappkey command should be used
to save
the key in the registry. The command takes no parameters, and accepts
no
user input - it can only be used after the getappkey
command has completed successfully. The application key
read by getappkey is entered in the registry together with
the
id
under HKEY_LOCAL_MACHINE\SOFTWARE\$VENDOR\$APP\$VER in
the string values ISappKeyID and ISappKey.
Your application can then validate the key at runtime using the ISkeyObject
if you wish, but this is not mandatory.
regdll dll_pathname
Register the named dll by calling its DllRegisterServer()
function. An unregdll command
will
be automatically added to the uninstall script for each call of regdll
desktop [-s] "program.exe"
This command simply adds the named program to the
current users
desktop, the -s option
causes
it to be added to the system (or common) desktop.
(Note: -s is ignored when the installation runs under
Windows 9x).
progmenu [-s] "program.exe"
"submenu\item_name"
This command adds the named program to the named submenu
bellow the Programs menu with the named of item_name.
If
submenu
doesn't exist, it is created (in fact, submenu
can
be a sequence of submenus - all will be created). The
-s option causes the item to be added to the
system
(or common) desktop, but this is ignored when the installation runs
under
Windows 9x
setreg -root_key_specifier[i]
"path_to_key"
"name" "value"
where
-root_key_specifier is
one of
-lm: HKEY_LOCAL_MACHINE
-cu: HKEY_CURRENT_USER
-cr: HKEY_CLASSES_ROOT
And "path_to_key" is a
registry path - elements that don't exist are automatically created,
unless
the root key is HKEY_CLASSES_ROOT.
If an i is appended to the root_key_specifier,
(e.g. -lmi) it is interpreted as an integral value as opposed
to a string value.
Note: "name" is
the name
of a string-value(REG_SZ), or an integral-value(REG_DWORD)
only these types of values can be added. Further Note:
if
"name" is “default” the default value is
set for the key.
getreg -root_key_specifier
"path_to_key" "name" NAME_OF_VARIABLE
where
-root_key_specifier is
one of
-lm: HKEY_LOCAL_MACHINE
-cu: HKEY_CURRENT_USER
-cr: HKEY_CLASSES_ROOT
And "path_to_key" is a
registry path
Note: NAME_OF_VARIABLE is the name
of an internal
variable that will receive the value of the "name"
registry string value. (only string-values and integral-values
can be accessed in this way - their is no need to tell the command if
the
value is a string or integer) The value can be accessed as follows,
once
the command has returned
message "Value Is: $NAME_OF_VARIABLE"
NB: if the "name" does not exist or is set to the
empty
string, $NAME_OF_VARIABLE will have the value "(empty)"
(In fact this is true for any automatically set variables, they will
always contain "(empty)" when the string they are being set from
contains
no characters).
Note: if "name" is “default”
the
default
value is accessed for the key.
setsvc
-service_mode
service_name
Where -service_mode is
one of
-a: automatic - i.e. start at boot
-m: manual start
-d: disabled
And service_name is the
name of an already installed service, i.e. it is the name of a key
under
SYSTEM\CurrentControlSet\Services
This command sets the mode of an already installed service.
If you plan
to included a service in the installation, you should make it self
installing,
i.e. copy it to the required directory and execute it with the -i
option.
You may, however, use this command to alter the mode of the service
once
it is installed.
getdllref pathname NAME_OF_VARIABLE
This command retrieves the reference count of the
named
DLL (pathname) and places it in NAME_OF_VARIABLE.
if the DLL does not have a reference count, the value in $NAME_OF_VARIABLE
is
-1. The pathname argument can be any pathname, it need not be
a DLL
odbc [-sx] action "driver"
"attributes"
Where -s causes a system DSN to be
added/removed/configured
and -x will prevent DSNs added being removed by the
uninstall
script
and action is one of add remove or
config
This command allows you to add, remove or configure
ODBC data
sources, the driver parameter is the name of the ODBC
driver,
and will be something like "SQL Server", the attributes
parameter is a semi-colon separated string, something like...
"DSN=MyDSN;SERVER=hostname;NETWORK=DBMSSOCN;DESCRIPTION=MySQL
Server;DATABASE=MyDatabases"
This command passes its arguments straight through to the SQLConfigDataSource()
function.
All DSNs added by this command are automatically
removed by the
uninstall script, unless -x is specified - this
prevents
the data-source being reomved by the uninstall script.
dcomcfg
-e
dcomcfg -r[l] "object_name" "server"
dcomcfg -l "object_name"
This command allows limited configuration of DCOM.
The first version of the command simply enables DCOM.
The second version arranges for an already
locally-registered object
to be started remotely on the named server. If the l flag
is present in the option string, local activation is also allowed,
otherwise
local activation is prevented.
The third version of the command prevents remote activation
of the object.
NOTE: If the object was previously enabled for remote activation it
will
need to be registered again after this command has completed if the
object
is actually to be available locally.
The following alterations are made to the registry
to run an
object remotely...
Firstly, the CLSID of the named object is obtained using the
standard
function, CLSIDFromProgID()
Then, the APPID of the object is obtained from CLSID\{object-CLSID}\APPID.
If this key doesn’t exist it is created and given the same value as the
object-CLSID.
Once the APPID is determined, the APPID
values
APPID\{Object-APPID}\RemoteServerName
is set, and the 2 values RunAs and ActivateAtStorage
are
removed.
When this is done, local activation keys are removed
(provided
local activation was dissabled with the -l option). The following
values
are removed...
CLSID\{object-CLSID}\LocalServer32 and CLSID\{object-CLSID}\InProcServer32,
in
addition, the following values are also removed if present
CLSID\{object-APPDI}\LocalServer32
and CLSID\{object-APPID}\InProcServer32
When preventing remote activation (i.e. re-allowing local
activation
with dcomcfg -l), the key value APPID\{Object-APPID}\RemoteServerName
is
removed, but the local activation values are not re-instated - this is
why you must then re-register the object to fully re-enable local
activation.
Note: if the APPID value doesn't exist an error is
generated
, it is not created by the dcomcfg -l command.
associate ext "path" "short_name" "long_name"
associate -u ext "short_name"
This command associates a filename extension (ext)
with a path. The short_name parameter is a the app_id
of
the command – you should try and avoid spaces in the short_name.
The long_name can be anything you want, it could be
the
same as the short_name.
Note; if you are supplying an OLE or ActiveX object or
document, you
will not need this command as registering the object/document will also
add an association. However, if you just have a non-ActiveX program
that
takes a file as a command line parameter, using this command will allow
double-clicking the file in expoler to start the associated program
with
the double-clicked file as a parameter.
If the –u form of the command is used, the
association
is removed (un-associate). An un-associate command is automatically
generated
in the un-install script.
The wizard, ISbuild, will automatically
add association
commands if you request it,
updating
This command sets 'update' mode. The sole consequence
of this
is to prevent the contents of the $HOME directory from
being deleted if the installation fails, and to prevent the existing
uninstall procedure from being overwritten.
Uninstall Commands
These commands are automatically added to the uninstall script that is
generated after a successful installation - they are rarely used for
installation
operations, but are available if you require them. The uninstall script
is automatically generated after a successful install, and is accessed
from the Windows Control Panel's Add/Remove programs option.
unregdll dll_pathname
This command call the DllUninstallServer()
function in the named dll. If the function does not exists, no error is
generated, as many dlls do not support this method. unregdllcommands
will be added to the uninstall script for every call to regdll.
For this reason regdll is preferred to any other
method
of registering a dll. Note the command will NOT unregister an object if
the DLL is referenced counted and has a reference count greater than 1.
rmtree directory_path
Remove all files and directories under directory_path.
If files are in-use in the directory_path the user
will
be prompted to quit applications, if the files are still in use, they
are
scheduled for removal at the next reboot.
remove file_path
Remove the named file, if the file is in use, the
system is
configured so that it is removed during the next reboot. If the file is
reference counted, the reference count is decremented, and the file is
only deleted if the reference count goes to 0.
rmkey -root_key_specifier key_path
where root_key_specifier
is
one of
-lm: HKEY_LOCAL_MACHINE
-cu: HKEY_CURRENT_USER
-cr: HKEY_CLASSES_ROOT
Remove the named key and all the values it contains.
This command
will fail if key_path contains sub keys (i.e.
not
values, but actual keys)
rmregtree -root_key_specifier key_path
where root_key_specifier
is
one of
-lm: HKEY_LOCAL_MACHINE
-cu: HKEY_CURRENT_USER
-cr: HKEY_CLASSES_ROOT
Remove the named key and all sub keys.
Even though all InstallScript commands automatically give rise to an
entry
in the uninstall script to reverse their actions, it may be, that you
need
custom processing during the uninstall phase, e.g. if you installed a
service
by running it with a -i option, you may want to run it with a -u
option
to uninstall it. You can add custom processing by issuing one or more onuninstall
commands during installation, these have the effect of manually adding
commands to the automatically generated uninstall script.
onuninstall "command and
arguments..."
This command adds the text in "command and
arguments..."
to the uninstall script. All onununstall commands are
process
before any automatic actions in the uninstall script.
Note: this command allows one argument only, so the "command
and arguments..." must be quoted. Remember, however, that
when
the uninstall script runs, "command and arguments..." will
be seen as a command in its own right, without the quotes, however,
some
of its parameters might themselves need quotes - you can solve this
problem
by using single quotes inside double quotes - singe quotes have exactly
the same meaning to InstallScript as double quotes, e.g.
onuninstal "run 'c:\Program File\MyApp\myservice' -u"
You can see an example of onuninstall being
used in
the Automatically Generated Uninstall
sample
bellow.
You will need to use this command if your install script
installs services
that need to be stopped and uninstalled, or if your script
registers
COM objects that need to be unregistered when your application is
uninstalled.Services
and COM EXE objects normally install and register themselves,
InstallScript
does not contain any commands for doing this, you should ensure that
your
exe-objects/services are self registering/installing and self
unregistering/uninstalling.
SMS Support
Basic SMS support is available for InstallScript packages. Their are 3
features that are implemented specifically for SMS support.
Silent Mode and Input from a Response File
The command line argument /sms:silent or /sms:response_file_name.ini
can
be given to InstallScript. in both cases InstallScript runs silently,
without
displaying windows and without user input. In the first case all
commands
that would require user input are given default values; in the case of
dialog boxes with initial values, this is the initiall value specified
in the command, and, in the case where the dialog just has a YES
or OK button,
YES is the default. Note: if the setappkey
command is used with /sms:silent, an error is generated - a
response
file is required if you use the setappkey command!
In the second form of the argument, response_file_name.ini
is a 'response file'. Input for each dialog command is read from
the
file, the format of the input is just the command name followed by the
value, E.G. choosedir=c:\Program Files\Octatec\InstallScript\1.00 In
the case of the input command, however, the left-hand-side of
the equals sign is the name of the variable being set.
Note: if you run programs from within your InstallScript, it
is your
responsibility to ensure they behave correctly when in SMS mode - to
help
with this, the variable $SMSMODE will have the value
true
when in SMS mode, and $SMS_INI_FILE will have the
value
of the response file or (empty) if their is no response file.
You can then read the response file from own programs if you wish. Any
programs that register themselves or initialize services must do so
without
requesting user input.
A response file is automatically generated by ISbuilder when sms-support
is enabled.
The /sms command line option is also implemented by
SXAzip thus
allowing the installation of Self Extracting Archives using SMS.
A response file has the same format as a windows INI
file. It
must have an [InstallScript] section where all the InstallScript
responses
are located. It can also have a [SXAzip] section where a
password=<password>
entry can be made to enable the installation of packages that are
password
protected.
MIF Interface
InstallScript uses the MIF interface to communicate its status to SMS.
This is done using the InstallStatusMIF()
function
in ismif32.dll. If this DLL is not present, or
not
able to be loaded by LoadLibrary(), the MIF interface will not be used.
This should not be a problem, since if you are distributing a system
via
SMS, all SMS DLLs should be on the client system. If InstallScript
cannot
load, ismif32.dll an error is reported in the
standard
log file - the log file is maintained just as normal when in SMS mode.
PDF File Generation
The ISbuilder application is capable of
generating
a PDF file when in SMS Mode. It should be noted, however, that you may
need to manually edit the generated PDF file before you can use it
directly
with SMS - it should be regarded as a guide rather than a definitive
PDF
file.
Application Security
How do you stop your application being installed by those who have not
purchased it? Well, this is a difficult problem, it is almost
impossible
to stop someone who is determined, from pirating your application,
except
perhaps, by using specialized hardware. InstallScript has a couple of
features
to help you protect your application from casual copying.
The first step to protect your application is to protect your
installation
archive. You can do this if you use SXAzip
by simply setting a password on the archive - if you're felling
particularly
paranoid, you can encrypt the archive as well, but encryption increases
the size.
Next you should use some kind of Activation key. This key
should be
validated during installation, and, for even tighter security, it
should
be validated whenever your application runs. You may have your own
Application
Key technology, and this is fine - Octatec itself uses its own
application
key generation technology which it calls from
Installation
scripts. However, if you don't wish to go to the trouble of
developing
your own application key subsystem, you can use the one provided with
InstallScript.
ISkeyGen
The first step in using InstallScript's own application key
functionality is to generate a key. You do this by using the ISkeyGen
program supplied with InstallScript. It takes a 3 digit number and
generates
a 12 character application key. This key is used as the user input
to the
setappkey dialog command. The
command itself takes the 3 digit number as its only parameter. If
you wish, you can leave it at that; however, for added security, you
can
use the ISkeyObject COM Automation object to check the key
whenever
your application runs. Note: this facility can be automatically added
to
an InstallScript by using ISbuilder.
ISkeyObject
This object is an in-process automation object, implemented in the DLL
ISkeyObject.dll.
You can use it to verify the application key at runtime. If you choose
to use it, you will have to distribute the ISkeyObject.dll
with
your application and register it during the installation procedure.
(You
are permitted to distribute this DLL with your application under the
terms
of the license).
If you do distribute this object with your application, you
should copy
the DLL using copy -s to ensure that
if
the object is already installed, it will be correctly installed and
reference
counted when you install your own application.
The object's name is "ISutilities.Key". (A
type library
and ODL is supplied with the installation.)
The object implements the following methods...
[id(1)] boolean
VerifyKeyFromReg(BSTR regPathName);
[id(2)] boolean VerifyKey(BSTR key, long
keyID);
The first method just takes the path of your application's
keys in the
registry, i.e. SOFTWARE\$VENDOR\$APP\$VER. The second
method
is an alternative to the first, it takes the application_key
and and the application_key_id. You can use which
ever
method is the most convenient.
As already stated, this is optional functionality, available
for use
if you want some degree of protection and don't have your own key
generation
technology. Octatec does not make any claims about the ability of the
application
key to withstand attack from determined software pirates. It is just
intended
to prevent casual copying. And of course, if your just distributing
software
within your own organization, you won't need any security features.
Note: if you use ISbuilder you can limit
the computer on which the installation is run and limit the number
of times the installation can be run.
InstallScript Conventions
The following conventions should be observed when writing scripts. You
don't have to observe these conventions, but if you set the following
variables,
you will find things a lot simpler - in particular, the automatic
uninstall-script
generation facility is only available if the first 4 variables bellow
are
set. ISbuilder handles all this for you.
VENDOR The name of your
company
APP The name
of
the application
VER The
version,
e.g. 1.00
HOME The location
of the
application on the disk, e.g. "?:\Program Files\$VENDOR\$APP"
this
location can be changed by the user, the above is just a default
REGHOME The location of the
application's
registry entries, e.g. "SOFTWARE\$VENDOR\$APP\$VER"
this
location cannot be changed by the user, and the final value of $HOME
should
be recorded in the registry,
e.g. setreg -lm "$REGHOME\Home" $HOME
You should then use the HOME variable when copying
files, and
REGHOME
when setting registry entries, as done in the example scripts bellow.
Further,
when you set HOME you get automatic drive
letter checking and substitution.
Return values from external programs
If you write a program specifically to be used in an InstallScript,
e.g.
to verify a user entered key, you should observe the following
convention.
The first command line argument should be the name of a file where the
program will write its output - the program should write InstallScript
commands to the file. It can write whatever it wants but it should at
least
write a command of the form "set RESULT X",
where X is 1 or 0 signifying success or failure. The
program
can receive whatever command line arguments you want after the first.
This
mechanism is not particularly elegant but it is powerful and simple. Of
course, if you don't want any feedback from the program, and/or you
don't
intend for the script to wait for the external program to complete, you
don't have to adopt this convention.
If you are calling a 3rd party supplied program, it probably
won't adopt
this convention. However, InstallScript preserves the exit status of
all
programs it executes (and waits for), in the special variable $?,
regardless of whether they observe the above convention or not.
Installation Of Multiple Versions Of the same application
InstallScript does not support the existence of multiple
versions
of the same application on a system. If you use the oktoinstall
command, the user will be prompted to uninstall previous versions
before
continuing. The problem with multiple versions on the same system
arises
when the uninstall procedure runs, it will remove all files and
registry entries relating to all versions. This behaviour is
deliberate,
it is not a bug.
ISbuilder - The InstallScript Wizard
ISbuilder is part of the InstallScript package, It allows you to build
an Installation script and an SXAzip Self
eXtracting
Archive just by dropping files onto the application. You simply
decide
what files make up your package and then drop all the files onto
ISbuilder,
which handles the intricacies of adding the InstallScript executables
that
will be needed to run the InstallScript when it builds the SXAzip
archive.
(Note - to get the most out of ISbuilder you will also need SXAzip).
Once you have added your files, just take the File/Save and
Generate
option.
Bear in mind, that essentially, installing software is a very
simple
procedure, files are just copied to a pre-determined location on a
target
system. You specify the files in ISBuilder by drag-and-drop.
When
this is done, you can then set properties on the file to control such
things
as whether or not the file is on a menu, has an icon on the desktop or
is registered. Complexities such as the situation when the file
is
in use and cannot be overwritten on the target system are handled
automatically.
Main View
ISbuilder maintains a list view, displaying the files you have added
together
with 5 attrinbutes that control how the files are processed by the
InstallScript.
Note: in the following view, clicking a column will sort on
that column.
You can optionally have the display highlight rows that are the same
during
the sort process, this is controlled from the View menu.
Double-clicking
a row allows the attributes to be edited - in addition, many rows can
be
selected, and then a right-button context menu allows the properties to
be set for all selected rows. To add files to the display just drag and
drop files or directories onto the application. Note: if, after you
have
adde files, one of the files is removed from its original location, the
file will be highlighted in red in the display.
As soon as ISbuilder starts it is ready to accept files - you
give the
project a name when you take the File/Save and Generate
option.
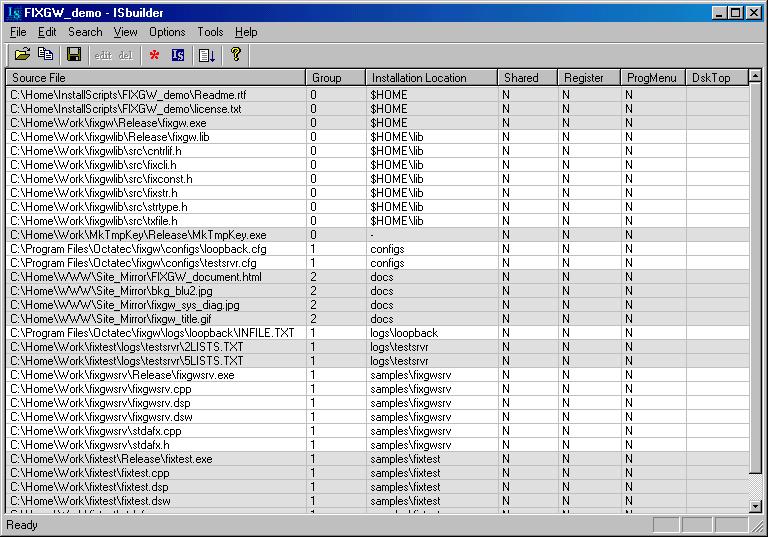
SourceFile is the file on the local system that you are
going
to include in your distribution. The easiest way to add files is by
drag-and-drop.
The view above has been configured to show file-names only in the
source-file
column (using the View menu), however the default is to show
the
full path.
Group is just an identifier that groups files together
- files
can be excluded or included by the user when the package is installed.
Group 0 cannot be excluded (this is a convention enforced by
ISbuilder).
When the user installs your package, he will be prompted with a list of
groups you define here, and allowed to selective include or exclude
groups.
You can give the groups meaningful names which will be displayed to the
user rather than just "files in group 0" from the Edit menu. Note
however,
if you turn off Custom Installation Support
or only have one group, the user will not be allowed to include/exclude
files. NB: if you do turn of Custom
Installation Support the Group identifier plays no part in the
installation.
InstallationLocation.
This
is the relative location of the file when it is installed. $HOME
represents the users choice of destination directory made during
installation.
If you wanted to place help documents in a docs
directory
and/or samples in a samples directory, you would just
replace
$HOME
with docs or
samples,
this would be interpreted as $HOME\docs
etc. In the above example
$HOME\lib could have been specified
as just lib,
and log\loopback is actually
interpreted as $HOME\log\loopback. If you mark the
file
as Shared, the system will suggest that the location
should
be $SYSDIR, but it will not enforce this. It may be, that you
do not actually want the file actually installed on the system, e.g. if
you have a configuration program you want to run, perhaps to set up
licence
keys or provide some specialist configuration, you can include the file
in the list and set the InstallationLocation to a single dash (-),
in which case the file will not actually be installed on the system,
but
will, however, be available (in the current directory) when the
installation
runs - you can use the Tools/View InstallScript menu
option
to edit the script and use the run
command to execute your specialist
program (place the command between a pair of
#N{{
directives so that it will be preserved during future generations.)
Shared. If the file is marked as shared, the location
in InstallationLocation
is only a hint! If the file is in the list of shared objects in the
registry,
the file is updated in that location rather than the
Installation
Location - but don't worry, any subsequent registrations or any other
operation
will work on the correct file, wherever it is copied (Basically, the copy
command is used with
-sar options).
Register. If this property is Y the file is
assumed to
implement a COM object, and it is registered. Only .dll, .ocx
and .exe files can have this property set to Y. Note
if
the file is an exe, it is assumed that running it with /RegServer
registers it - you can change this parameter from the Preferences
Dialog.
Also, when an exe registers itself, you should ensure that it
then exits afterwards, otherwise the installation will wait until the
users
closes the exe. Further Note: if you register .dll
or
.ocx
files they will automatically be unregistered during the uninstall
procedure,
.exe
files are not automatically unregistered unless this is specified this
in the
Preferences Dialog.
ProgMenu, If this property is set, the file is added to
the systems
Programs menu. Note: .dll files cannot have this property
set.
DskTop, If this property is set, the file is added to
the systems
Desktop. Note: .dll files cannot have this property set.
These properties can be changed either by using the Edit
Menu,
using the Right Hand Button Context menu or by double
clicking an item. One or mode rows must be selected before
anything
can be changed.
Sort HighLighting Option
As already mentioned, when sorting (i.e. clicking a column
heading),
consecutive rows that match the sort criteria can be highlighted. The
highlight
can be applied to
the background or the text, and can be any colour you like. This is
all controlled from the View menu. A very-light grey
background
highlight is quite effective, and
then sorting on the Installation Location column gives a useful
display, the screen-shot above uses this technique A Further point
worth
noting, the source-file display can be set to show file-names only
rather
than full path names.
Preferences Dialog
The following preferences dialog box, available from the Options
Menu allows you to set some important data needed for the
generation
of an InstallScript file.
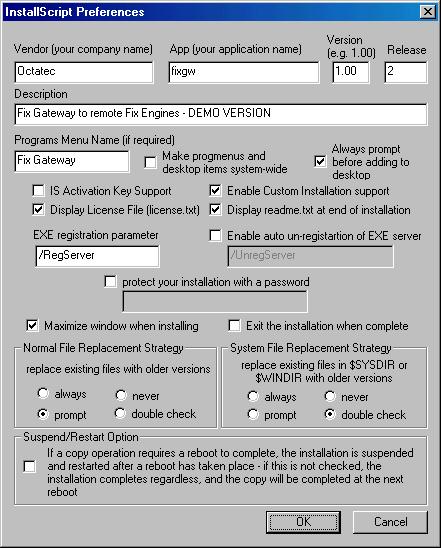
Vendor. Your company name
App. Your application name.
Version. Your application's version.
Release. This is an optional field that can be used to
supplement
the Version..
Description. A description of your application. The
user will
see these 4 items when he runs the SXAzip archive, and will be given
the
option to continue or not before any files are copied to his system or
any programs run.
Programs Menu Name is the name that items
will have
on the Programs Menu, if this is left blank, the App field will be used
instead.
Make progmenus and desktop items system-wide. If this
is set,
any progmenu or desktop items that are created will be available to all
users of the system, if it is not set, only the installing user will
get
the items.
Always prompt before adding desktop items. If this is
set, the
user is always asked if he wants the item on his desktop. (This setting
does not affect progmenus).
Display License File. With this item checked, license.txt
is
displayed early in the installation allowing the user to cancel. Rich
Text
documents can be displayed; if license.rtf is
present
rather than license.txt, that file will be displayed
IS Activation Key Support. This setting includes
InstallScript
commands to handle an IS Activation Key, the
key is saved in a file "key.txt", and can be viewed from the Tools
menu. NB: If you disable ‘default registry maintenance’ you will not be
able to use this option.
Enable Custom installation
support.
If this is selected, the user is able to selectively include or
exclude
groups of files during installation. If this is not selected, the
Groups
field on the main display is unused.
Display readme.txt (or readme.rtf). With this item
checked readme.txt
is displayed after the installation has completed successfully. Rich
Text
documents can be displayed; if readme.rtf is
present
rather than readme.txt, that file will be displayed
Maximize when installing. InstallScript runs in a
maximized window.
Exit the installation when complete. If this is set
InstallScript
will exit when the installation is complete, otherwise, InstallScript
will
have to be closed by the user after it has completed.
Update Mode
Select this mode is you are producing an update rather than a full
installation.
Disable default banner
You can disable the default banner text displayed on the screen, you
can optionally add your own banner commands
directly to the install script text file manually
EXE registration parameter. If you set the Register
attribute
on an EXE, the EXE is executed with this parameter. The parameter can
be
blank. Note - this applies to all EXEs registered, so you should ensure
they are all consistent (MFC and ATL exes require different command
line
parameters to register, MFC apps typically require none, whereas ATL
apps
require /RegServer).
Enable auto-unregister of EXE servers. If you have
written your
EXE servers to be able to unregister themselves (ATL apps will do this
by default, but MFC apps won't), then you can set this flag to include
unregistration. Note: in the case of shared objects (DLLs or EXEs) the
system will not un-register them if the implementing DLL or EXE has a
reference
count greater than 1)
Protect your installation with a password. This setting
causes
the SXAzip archive to have a password, which you are free to choose
yourself.
(the password word will be displayed as you type it)
Normal File Replacement Strategy. This item allows you
to set
the behaviour of InstallScript when a file it is about to copy would
replace
a newer version in a non-system directory. You can specify always-overwrite,
never-overwrite,
prompt-for-permission-to-overwrite
and prompt-twice-for-permission-to-overwrite . This action
applies
to 'Normal' files (i.e. non-system files), the following item applies
to
System files.
System File Replacement Strategy. This item allows you
to set
the behaviour of InstallScript when a file it is about to copy would
replace
a newer version in a system directory - i.e. in $WINDIR or $SYSDIR.
Suspend Restart Option
Imagine the situation where your installation requires you to run one
of your applications for configuration or registration purposes. If
that
application depends on the MFC DLL you will have included it in your
distribution
and will copy it to the target system. If, as is very likely, the
target
system already has a version of the DLL,
and it is in use, the copy of your version of the DLL will be postponed
until a reboot. (your version of the DLL should only be copied if it is
newer than the existing one). Now, depending on how different your MFC
DLL is to the existing one, your applications may not be able to run
with
the existing one, and so the installation would fail. This option
specifies
that after all files have been copied, if any copy operations were
posponed
until a reboot, the whole installation process will be suspended, and
automatically
restarted after a reboot. You should probably always include this
option
if you run any programs that depend on DLLs that have been copied,
indeed,
if you are replacing an existing application that might be running, and
you need to run it during the installation, the same situation arises.
In terms of the InstallScript language, this option places arestart
-r command after the last copy command.
SMS Support Dialog
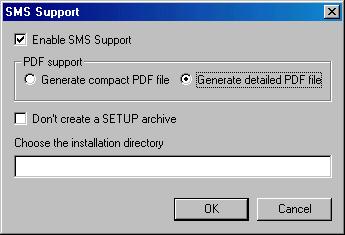
This dialog is also available from the Options Menu.
If the Enable SMS Support box is checked, the other
options are
available. The main effect of enabling SMS mode is
the
creation of a PDF file and a response file. There are 2 types of PDFs
that
can be generated; the Compact type assumes that only the Self
Extracting
Archive will be distributed, hence that is the only file listed in the
PDF. The detailed PDF assumes that all the files in the package will be
distributed separately, hence they are all listed in the PDF. NB: if it
is your intention to distribute all the files separately, you may want
to use SXAzip in non-setup mode (just to collect the files together),
you
can do this by checking the appropriate box in the above dialog. You
should
also select an installation directory - this choice overrides the
normal
default of
?:\Program Files\$VENDOR\$APP\$VER
The response file is just a standard .ini file, with
a [InstallScript]
(and possibly a [SXAzip] section if the
archive
is password protected). Commands find their input by looking for a command=input
string in the response file. The one exception to this is the input
command,
in this case the name of the variable being input must appear on the
left-hand-side
of the = in the .ini file. When deciding whether to replace
newer
files with older ones in SMS mode, InstallScript looks for an entry ReplaceNewerWithOlder=TRUE,
note however, this entry is ignored in favour of the Normal/SystemFile
Replacement Strategy setting if it is set to ALWAYS or NEVER.
If the File Replacement Strategy is PROMPT,
the
default 'answer' to the prompt in SMS mode is TRUE if ReplaceNewerWithOlder
is
not in the .ini file.
A further effect of running in SMS mode is that a MIF file is
generated
by InstallScript, to inform SMS of the state of the installation.
(However,
the generation of the MIF file is dependent on the dll ismif32.dll
being present on the system.
NOTE: you should probably always use the Compact PDF option
and distribute
your package as an SXAzip Setup Archive. If you don't do this, you will
get problems with licensing of InstallScript - if InstallScript runs
outside
of an SXAzip archive, it will require a license on the machine on which
it runs. Licensing is not a problem when it runs from within SXAzip as
part of a package, since we don't want to enforce everybody you send
you
package to, to have to have InstallScript licensed on their machine.
Once you have saved and generated an SMS mode project, you
will be able
to test it in normal mode or in SMS mode - when running in SMS mode, no
windows are displayed an all user input comes from the response file.
Note
- even if you have not included SMS support you can still run a test in
SMS mode, but in that case there will be no response file, and so all
commands
that require input will receive their default values, (the default
value
of commands that ask YES/NO or OK/CANCEL questions
is
YES
or OK)
Dependencies Dialog
This dialog is available from the Edit Menu and from the
(Right-Hand Button context menu) provided one item only is selected
from
the file list.
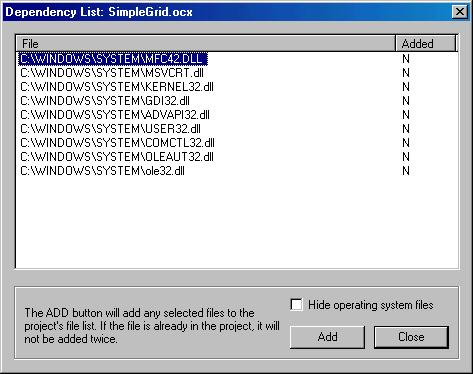
The dialog displays all the dependent DLLs of the selected
file. If
you click the Add button, the files that you select on the
Dependency
dialog will be added to the main file list. The newly added files will
automatically be marked as selected when the Dependency dialog closes.
By default, operating system DLLs are not displayed in the
Dependency dialog, as you will almost certainly not want to distribute
them, (the image above is showing all dependent DLLs). The MSVCRT.DLL
is
not classed as an Operating System DLL, but you will probably not need
to distribute it, as it is found on most systems. DLLs that are already
added to the main file list will contain a 'Y' in the Added
column
- these items can be selected, but will not be added a 2nd time,
however,
NB: if all the rows contain a 'Y' in the Added column, the Add
button will be disabled. You can read more about dependencies
in the section bellow.
Note: the files that ISbuilder views as Operating System are
defined
by a colon separated list of files stored in the registry key HKEY_LOCAL_MACHINE\SOFTWARE\Octatec\InstallScript\1.00\OSfileList,
by
default, this key has the value
"KERNEL32.DLL:GDI32.DLL:USER32.DLL:OLEAUT32.DLL:OLE32.DLL:ADVAPI32.DLL:COMCTL32.DLL"
Asscociating a File Extension with a
program (EXE)
The first thing to say is, that if your program implements an ActiveX
object
or document, you almost certainly don't need to use this facility. If,
however, you have a none-ActiveX program that accepts a file on the
command
line, you can use this option to arrange for your program to be started
with the file as a parameters when a file with a particular extension
is
double clicked in Windows Explorer.
The following dialog is available from the context menu
whenever an
EXE file is selected. It is also available from the Edit menu, to allow
editing of existing file
associations regardless of selected items. You can have as many
associations
as you want.
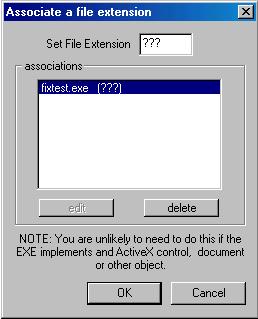
Once an item in the list is selected the extension that is
associated
with the EXE can be edited in the box at the top. The extension can be
any lenght, and should be specified without a leading dot.
Saving And Generating
When you take the File/Save and Generate menu option you
will be asked for a project name, by default this is the same as the
App
name in the above dialog directory will be created with the
project
name, and all files will be saved their. The final SXAzip file that you
will distribute will have the name Proj_Ver.exe.
After generating you will have files name install.txt (the
InstallScript) SXAzipBuild.txt ( a script to build the
SXAzip archive) and the above mentioned Proj_Ver.exe
file. You will also have a file named Proj.isb,
this is an ISbuilder project file, you can re-open ISbuilder
projects
and add/ remove files and generate again, but note, this will overwrite
previously generated files, and consequently if you have customized
these
files, the customization will be lost (unless you have added it to the
customization areas of the InstallScript).
Once you have run the Save and Generate
command, the options
on the Tools menu will be available, from where you can test and
view/edit
the generated Installation Script.
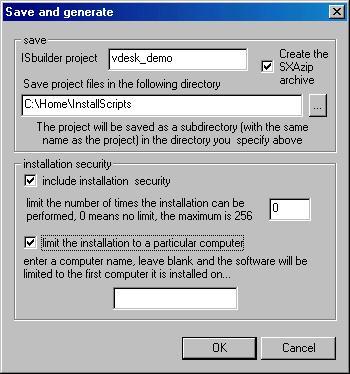
The save and generate dialog (seen above) also allows
you to
control Installation Security. If you wish, you can limit the number of
times the output SXAzip self-extracting archive can be run, and/or
limit
the computer on which the archive can be run - if you check limit
the installation to a particular computer and leave the
computer
name blank, the first computer on which the installation is run becomes
the one-and-only one on which the installation can be run,
however, the isreset program (included with the distribution) can be
used to re-assign the installation to a different computer. Isrest
takes
the path-to-the-archive and the application-name
as
command-line parameters, it uninstalls the software on the current
computer
and allows it to be installed on a different computer, the name of the
alternative computer must be supplied to isreset.
Running a Program after Archive Generation
You may configure ISBuilder to automatically run a program
(batch
file or command) after the archive has been generated; the most likely
reason to do this is if you want to publish the archive somewhere. To
do
this, use the Options/Run Command after Archive Generation.
Customizing The InstallScript
When the InstallScript is generated, 5 customization areas are created,
where you can add your own commands - these commands will be preserved
during future Save And Generate commands. The
customization
areas are marked by #N{{ and #N}},
and are strategically located before script initialization (#0)
where your could add to the banner, at the start of the script
(#1)
where you could do proprietary key validation if you don't use
InstallScript's
own key validation, just before all files are copied (#2),
just after all files are copied and before any restart might
be
processed (#R), and finally, just before the installation
completes (#3), where. you might want to add the
installation
of services or further registry settings. Note: if you distribute files
to execute during the setup procedure but don't
actually install them, and restart
processing
is enabled, the #R location is the last place you will have access to
them.
ISBuilder Tutorial
Imagine you have 3 files to distribute, a program, MyApp.exe, a
DLL that must be registered, MyApp.dll and a documentation file
MyApp.html.
Start ISBuider by clicking the Icon,
Using the menu option Preferences/Options...
and set your
preferences from the preferences dialog.
When a customer runs your installation, your application will
be installed
under <C:\Program Files>\Vendor\Product\Version
Where <C:\Program Files> can be changed by the user
running
the installation and Vendor\Product\Version is taken from the preferences
dialog.
Drag and Drop the 3 files onto ISBuilder. The 3 files
will be
represented by rows in the ISBuilder application.
Double click the ISBuilder DLL file entry and
from the
dialog displayed. check the Register checkbox (this
checkbox
is only available if the file is a DLL or EXE).
You may want the documentation file to go into a
subdirectory
under the main application directory,
Double click the ISBuilder document entry and change the installation
location to docs (this is automatically relative to
$HOME) - the document will then be placed in <C:\Program
Files>\Vendor\Product\Version\docs
during
installation.
Save The project using the menu option File/Save
and Generate. You will be prompted form a Poject
name
and directory location. The project is saved in a subdirectory
of
the directory location with the name of the project. The actual
installation you distribute will be called Product_Version.exe
and will be located in the same directory.
Now you can test the installation using the menu option Tools/Execute
the SXAzip Archive - test the installation Or by running Product_Version.exe
directly if you wish.
Now imagine that you want MyApp.exe to be on the programs
menu and on desktop as an icon. Double click the ISBuilder
MyApp.exe file entry and from the dialog displayed check the Add
to Desktop checkbox and Add to Programs Menu
checkbox.
If any of the files being copied to are in use at the
time of
installation, the user will be told a re-boot is required and they will
be copied at the next reboot. You don't need to set any
additional
property to get this behaviour, it automatically happens for any 'busy'
file.
An uninstall program is automatically generated that will
remove desktop
items and un-register DLLs
IsBuilder generates an InstallScript which you can edit to
tailor to
your own needs, but it is quite likley you won't need to do this.
A Word On 'Distributing Dependent
DLLs'
There are 2 types of Dependent DLLs, those linked to the application at
time of building, and those loaded by the application at runtime. The
Dependency
dialog of
ISbuilder will detect the 1st type. Of the 1st type, most of them will
be Operating System DLLs, which you won't want to distribute with your
application. DLLs like
the C++ MFC DLLs or the VB RUNTIME DLLs will need to
be distributed with your system if they appear in the dependency list.
The
C RUNTIME DLL, MSVCRT.DLL, will probably
not
need to be distributed, but it can be. Of course, if you are
distributing
your application internally, or to a client who's system you know well,
you need not distribute dependent DLLs if you know they will be on the
target machine. ISbuilder can detect type-1 dependent DLLs using the Dependencies
Dialog.
DLLs that are loaded at runtime will mostly be ActiveX
objects. These
DLLs cannot be detected by ISbuilder, however, they should be easy to
detect,
as you must
explicitly included them in your code, perhaps using the C++ #import
or the VB Components dialog. DLLs could also be loaded at
runtime
by using the
LoadLibrary() call, again ISbuilder does
not
detect these, but you should be aware of any of these calls yourself.
Again,
unless you are completely certain that the target machine will contain
all your required ActiveX objects, you must distribute the DLLs (and
any
files required by the DLLs, e.g. licence files or other DLLs).
Of course, you must be certain that you have the correct
licence when
distributing any 3rd party DLLs.
Distributing VB ActiveX Components
If you are using VB to build Active X components, be sure you have
Binary
Compatibility mode selected, and further, be sure you are using
the
correct binary compatible file - if you get this wrong you will have
insurmountable
problems distributing such components. Having said that, the pitfalls
of
building VB active X components are beyond the scope of this document.
Licensing Issues
The simplest situation is that you buy one copy of InstallScript
and one copy of SXAzip for each developer that is going to be
producing
installation packages. The
licenses does not permit sharing, i.e. it is one license per machine
- we at Octatec believe the product is so cheap that it really wouldn't
be worth anyone breaking the
law for the price of an additional copy.
The SXAzip license permits the distribution of SXAzip
archives, including
ones that contain InstallScript installation packages. Under normal
circumstances, InstallScript will only run on a machine if it detects
a license, however this presents a problem if you want to install your
software on machines that
do not have an InstallScript license. Don't Worry - if InstallScript
runs from within an SXAzip archive, it does not need a licence on the
target
machine, SXAzip
provides it with a temporary licence.
If you have a lot of developer that might want to use
InstallScript
and/or SXAzip you may apply for a Site Licence.
If you wish to use InstallScript outside of SXAzip to install
packages,
you will need an InstallScript Licence on the target machine. If this
is
the case, you may also
want to apply for a Site Licence.
By far the simplest solution is to embed your installation
package within
an SXAzip archive - ISbuilder will do this automatically for you.
InstallScript Examples
There now follows 5 sample scripts.
-
A simple install script
-
A real-life example
-
A complex install script which calls sub-scripts
-
An update script
-
An automatically generated uninstall script
Note:
These are manually created install scripts. If you use ISbuilder,
very similar scripts will be generated for you;
you can get away without reading the following examples at all, all the
work will be done for you!
1. Simple Install
#---------------------------------------------------------------------------------
# INSTALLATION SCRIPT
# filename: "install.txt"
# simple installation script
set VENDOR MyCompany
set APP MyApp
set VER 1.00
set HOME "?:\Program
Files\$VENDOR\$APP"
#
define the APP VER VENDOR and HOME (installation directory),
# these variables are particularly important for generating the
"uninstall"
script
set REGHOME "SOFTWARE\$VENDOR\$APP\$VER"
# define the location of registry entries
title "$APP Installation"
#
set the title bar of the window
background 0:0:0
#
set the background of the main window to black
banner -l "$APP version
1.00"
"Times New Roman" 320 255:0:0
banner -l "(c) $VENDOR Ltd, YYYY"
"Times
New Roman" 240 255:0:0
# display some information in RED on the main window. using the "Times
New Roman" font and sizes of 320, and 240
maximize
# maximize the window
oktoinstall -advise
# check
for other installed versions, and give the user chance to stop the
installation
input KEY "Activation Key" "Enter the
$APP Activation
Key" " "
#
get the activation key from the user
run ValidateKey.exe
$PWD/result_file.txt
$KEY
#
run the ValidateKey program - this is a software-vendor written program
to
# verify the activation key - it uses the standard install script
return
mechanism
# to communicate the results of the verification, i.e. it writes a SET
command into
# the filename specified in the 1st argument on the command line,
the SET
# command will look something like
# "set RESULT TRUE"
# NB: ValidateKey.exe
is not part of InstallScript, it is Octatec's proprietary key
validation
# program. However, InstallScript does provide an
application key generation/validation facility if you
# don't have your own
call -r $PWD/result_file.txt
#
get
the RESULT written by the verification program by
# running the script the program is expected to have written
# -r = remove the script($PWD/result_file.tx) after running it
if $RESULT != TRUE
message "Sorry - your activation key is
incorrect"
cancel
endif
choosedir HOME
"Select the installation
folder" $HOME
#
let the user choose a directory into which the installation should go,
suggesting
# a suitable default, $HOME
setreg -lm "$REGHOME\Home" $HOME
#
record the installation directory in the registry
setreg -lm "$REGHOME\Key" $KEY
#
record the activation key in the registry
progress -3
#
initialize the file copy progress bar for 3 operations
# the progress bar is automatically modified by the copy command
# if it has been initialized
copy application.exe "$HOME/application.exe"
copy application.dll "$HOME/application.dll"
copy document.htm
"$HOME/docs/document.htm"
#
copy the required files - all required directories are automatically
created
# if the file is in use, the operating system is setup so that the file
will be
# copied during the next reboot
# NOTE: the target path is enclosed in double quotes, this is
particularly
important, as
# $HOME may contain embedded spaces - if it does and the whole path is
not in double
# quotes InstallScript will see too many parameters
progress -c
# indicate that the progress bar is complete
banner -clear
#
clear
all text in the main window
banner -c "
"
"Arial"
220 0:255:0
banner -c
"$APP..." "Copperplate
Gothic Light"
240
0:255:0
banner -c "
"
"Arial"
220 0:255:0
banner -c "Installation Completed Successfully"
"Arial"
240 0:255:0
# add a
GREEN installationcomplete
message to the screen
if "$NEEDS_RE_BOOT" = "TRUE"
banner -c " "
"Arial"
220 0:255:0
banner -c "The system requires a
reboot
before the installation can take effect" "Arial" 120 255:0:0
# add a RED message informing the user that a reboot is required,
# $NEEDS_RE_BOOT is set to TRUE is any of the files being copied are in
use, in
# such a situation, the system is configured to perform the copy at the
next reboot
endif
# end of script
# NB: an uninstall script is
automatically generated
and placed in $HOME\unintsall
2. Real Life Example
This script is the actual one used to install the SXAzip application,
and
is included in the distribution of InstallScript, named IS_script.txt
as an example/template for your own scripts.
#################################################
## Installation Script for the Full
SXAzip system
#### This Script is executed
automatically by
SXAzip, it should always
#### be called "install.txt". The SXAzip
archive
should be created with
#### the +F option so that all restored
files
end up in the same directory -
#### since this is a Setup Archive, this
will
be a temp directory, removed
#### after the installation
# see the documentation for full
details of all
commands,
# and further samples
############################################
## set up initial variables and
environment
set VENDOR "Octatec"
set APP "SXAzip"
set VER "1.00"
set HOME "C:\Program
Files\$VENDOR\$APP"
set REGHOME "SOFTWARE\$VENDOR\$APP\$VER"
###############################
## set the title in the Window
title "$APP Installation"
######################################
## set the contents of the main window
## you can display a bitmap instead if
you wish
background 0:0:0
banner -c "system software from" "Copperplate Gothic
Light"
120 100:100:255
banner -c "OCTATEC
Ltd"
"Copperplate Gothic Light" 320 100:100:255
banner " "
banner -l "$APP version 1.00"
"Times
New Roman" 240 0:255:0
banner -l "(c) $VENDOR Ltd, 1999" "Times New
Roman"
120 0:255:0
#############################################################
## confirm the installation and the
acceptance
of the licence
getreg -lm "$REGHOME" "Demo" DEMO
# (nb: -lm
= use HKEY_LOCAL_MACHINE)
if "$DEMO" != "(empty)"
# this is just a convenient way of flagging a DEMO version
# it doesn't
have to
be done like this
query -y RESULT "The Evaluation version is
already
installed." \
"You are strongly recommended to uninstall it first."\
"DO YOU WANT TO CONTINUE ('NO' is a good answer)"
if "$RESULT" = "NO"
cancel
endif
else
oktoinstall -advise
# check
for the current version and any other version being installed -
# the '-advise' option
forces the
command to issue a warning only
# about other versions,
without
that flag, if other versions are found
# the installation is
cancelled
endif
if "$RESULT" = "NO"
cancel
endif
display -c license.txt
#########################
## get the activation key
input KEY1 "Activation Key" "Enter the
$APP Activation
Key" " "
############################################
## run the proprietary Key Validation
program
# this EXE is specifically written to
validate
OCTATEC's application keys, you
# will have to provide your own if you
wish to
validate keys
# NOTE, however, the way the EXE
communicates
its results back to this script...
# we pass in the name of a file,
$PWD\result_file.txt,
into which the key
# validation program writes its result -
the
results are written in the form
# of InstallScript commands, we then
"call" the
result-file, the result file
# can contain any commands, however
usually they
are just "set" commands.
# The result-file should contain at least
one
"set" command that sets
# the variable RESULT
run ValidateKeyIS.exe $PWD\result_file.txt
$KEY1
call -r $PWD\result_file.txt
# if the
key is
valid KEY2 is also generated and
# written
to the
result file - this is just the way
# OCTATEC
handles
keys, you do not need to do it
# the same
way
if $RESULT != TRUE
message "Sorry - your activation key is
incorrect"
cancel
endif
#########################################################
## choose where the installation will go
in the
file system
## once the choice is made, enter it
into the
registry
getreg -lm "$REGHOME" "HOME" CURRENT_HOME
if $CURRENT_HOME != "(empty)"
set HOME "$CURRENT_HOME"
endif
choosedir HOME
"Select the installation
folder" "$HOME"
setreg -lm "$REGHOME" "Home" "$HOME"
## the following registry entries are
SXAzip specific
setreg -lm "$REGHOME" "Key1" "$KEY1"
setreg -lm "$REGHOME" "Key2" "$KEY2"
setreg -lm "$REGHOME"
"datafile"
"$HOME\SXAzip.dat"
#####################################################
## define filegroups that can be
optionally installed
# we define 2 groups of files, G0, and
G1, G0
files are 'mandatory'
# files are actually assigned to the
different
groups in the
# "copy" command
# note - you do not need to go through
this step,
you can just copy
# the files you want without assigning
files
to a group - you only
# need to do this if you are going to
give the
user the option not
# to install parts of the application, in
this
case, the documentation
# is optional
filegroup -m G0 "basic system"
filegroup G1 "documentation"
#####################################################
## let the user choose CUSTOM or DEFAULT
installation
# you do not need to do this, you can
just do
a default installation
select INSTALLATION_TYPE "select installation type"\
"choose from the list..."\
0\
"full installation,custom installation"
if $INSTALLATION_TYPE = "custom installation"
# present the
'choose files' dialog, this lets the user
# choose
the filegroups
defined in the previous step
choosefiles
else
filegroup -e G0
filegroup -e G1
endif
#################
## copy the files
# if you are not providing a custom
install option
you can omit the
# "file group", "select" and
"choosefiles" commands
above, and omit the
# 3rd parameter to the "copy" command
here, which
assigns files to groups
progress -i
copy SXAzip.exe "$HOME\SXAzip.exe" G0
copy SXAzip.dat "$HOME\SXAzip.DAT" G0
copy SXA_document.htm
"$HOME\docs\SXA_document.htm"
G1
copy
sxa_title.gif
"$HOME\docs\sxa_title.gif"
G1
copy
bkg_blu2.jpg
"$HOME\docs\bkg_blu2.jpg" G1
copy advanced-dlg.jpg
"$HOME\docs\advanced-dlg.jpg"
G1
copy setup-create-dlg.jpg "$HOME\docs\setup-create-dlg.jpg"
G1
copy
setup-dlg.jpg
"$HOME\docs\setup-dlg.jpg"
G1
copy sxa-browse.jpg
"$HOME\docs\sxa-browse.jpg"
G1
copy sxa-create.jpg
"$HOME\docs\sxa-create.jpg"
G1
copy sxa-menu-1.jpg
"$HOME\docs\sxa-menu-1.jpg"
G1
copy sxa-menu-2.jpg
"$HOME\docs\sxa-menu-2.jpg"
G1
progress -c
#########################################
## add START menu items and desktop icons
progmenu "$HOME\SXAzip.exe"
"SXAzip\SXAzip"
progmenu "$HOME\docs\SXA_document.htm"
"SXAzip\Documentation"
query -y RESULT "Do you want to add SXAzip to your
desktop"
if "$RESULT" = "YES"
desktop "$HOME\SXAzip.exe"
endif
####################################################################
## update the main window to indicate the
installation
has completed
banner -clear
banner -c " " "Arial" 220
0:255:0
banner -c "$APP..." "Copperplate Gothic
Light"
240 0:255:0
banner -c " " "Arial" 220
0:255:0
banner -c "Installation Completed
Successfully"
"Arial" 240 0:255:0
if "$NEEDS_RE_BOOT" = "TRUE"
# this variable is
automatically
set during installation
banner -c " " "Arial"
220
0:255:0
banner -c "The system requires a reboot before
the
installation can take effect" "Arial" 120 255:0:0
endif
3. Complex Install
#---------------------------------------------------------------------------------
# MAIN SCRIPT
# filename: "install.txt"
# complex installation script
calling "custom_install.txt"
and "default_install.txt"
set VENDOR MyCompany
set APP MyApp
set VER 1.00
set HOME "?:\Program
Files\$VENDOR\$APP"
#
define the APP VER VENDOR and HOME (installation directory),
# these variables are particularly important for generating the
"uninstall"
script
set REGHOME "SOFTWARE\$VENDOR\$APP\$VER"
# define the location of registry entries
title "$APP Installation"
#
set the title bar of the window
background 0:0:0
#
set the background of the main window to black
banner -l "$APP version
1.00"
"Times New Roman" 320 255:0:0
banner -l "(c) $VENDOR Ltd, YYYY"
"Times
New Roman" 240 255:0:0
# display some information in RED on the main window. using the "Times
New Roman" font
oktoinstall -advise
# check
for other installed versions, and give the user chance to stop the
installation
input KEY "Activation Key" "Enter the
$APP Activation
Key" " "
#
get the activation key from the user
run ValidateKey.exe $PWD/result_file.txt $KEY
#
run
the ValidateKey program - this is a software-vendor written program to
# verify the activation key - it uses the standard install script
return
mechanism
# to communicate the results of the verification, i.e. it writes a SET
command into
# the filename specified in the 1st argument on the command line,
the SET
# command will look something like
# "set RESULT TRUE"
call -r $PWD/result_file.txt
# get the RESULT written by the
verification program by
# running the script the program is expected to have written.
# NB: -r = remove the script($PWD/result_file.tx) after running it
if $RESULT != TRUE
message "Sorry - your activation key is
incorrect"
cancel
endif
choosedir HOME
"Select the installation
folder" $HOME
#
let the user choose a directory into which the installation should go,
suggesting
# a suitable default, $HOME
setreg -lm "$REGHOME\Home" $HOME
#
record the installation directory in the registry
setreg -lm "$REGHOME\Key" $KEY
#
record the activation key in the registry
select INSTAL_TYPE "Installation
Type" "select
from the drop down list" 0 "default,custom"
#
display a drop down list showing "default" and "custom", to the user
who
can choose one item or
#
cancel, if the cancel button is pressed, the installation is
automatically
stopped, "default" is the selection
#
displayed when the dialog is first displayed
if $INSTAL_TYPE = default
call custom_install.txt
#
call a sub-script to do the custom installation -
# subscripts are
contained
in separate files
else
call default_install.txt
# call a
sub-script to
do the default installation
endif
banner -c "
"
"Arial"
220 0:255:0
banner -c
"$APP..." "Copperplate
Gothic Light" 240
0:255:0
banner -c "
"
"Arial"
220 0:255:0
banner -c "Installation Completed
Successfully"
"Arial" 240 0:255:0
# add a
GREEN installation
complete message to the screen
if "$NEEDS_RE_BOOT" = "TRUE"
banner -c " "
"Arial"
220 0:255:0
banner -c "The system requires a
reboot
before the installation can take effect" "Arial" 120 255:0:0
# add a RED message informing the user that a reboot is required,
# $NEEDS_RE_BOOT is set to TRUE is any of the files being copied are in
use, in
# such a situation, the system is configured to perform the copy at the
next reboot
endif
# end of script
# NB: an uninstall script is
automatically generated
and placed in $HOME\unintsall
#---------------------------------------------------------------------------------
# SUBSCRIPT
# filename: "custom_install.txt"
filegroup -m G0 "executables and dlls"
filegroup G1
"documentation/help
files"
filegroup G2 "source
code samples"
#
define 3 file groups which can be optionally installed, the files in
group
0 (G0)
# are mandatory (-m) and cannot be excluded from the installation,
files
are assigned
# to groups by using the copy command
choosefiles
#
allow the user to choose the file groups to install
progress -i
#
initialize the file copy progress bar for the number of files in all
selected
groups
# the progress bar is automatically modified by the copy command
# if it has been initialized
copy application.exe
"$HOME/application.exe"
G0
copy application1.dll
"$HOME/application1.dll"
G0
copy application2.dll
"$HOME/application2.dll"
G0
copy document1.htm
"$HOME/docs/document1.htm"
G1
copy document1.htm
"$HOME/docs/document1.htm"
G1
copy document1.htm
"$HOME/docs/document1.htm"
G1
copy
src1.htm
"$HOME/samples/document1.htm" G2
copy
src1.htm
"$HOME/samples/document1.htm" G2
copy
src2.htm
"$HOME/samples/document1.htm" G2
copy
src2.htm
"$HOME/samples/document1.htm"
G2
progress -c
# indicate that the progress bar is complete
return
# end of subscript
#---------------------------------------------------------------------------------
# SUBSCRIPT
# filename: "default_install.txt"
progress -i 10
# initialize the file copy progress bar to 10
# the progress bar is automatically modified by the copy command
# if it has been initialized
copy application.exe $HOME/application.exe
copy application1.dll $HOME/application1.dll
copy application2.dll $HOME/application2.dll
copy document1.htm
$HOME/docs/document1.htm
copy document1.htm
$HOME/docs/document1.htm
copy document1.htm
$HOME/docs/document1.htm
copy
src1.htm
$HOME/samples/document1.htm
copy
src1.htm
$HOME/samples/document1.htm
copy
src2.htm
$HOME/samples/document1.htm
copy
src2.htm
$HOME/samples/document1.htm
progress -c
# indicate that the progress bar is complete
return
# end of subscript
4. Update Installation
#-----------------------------------------------------------------------------------
# APPLICATION UPDATE SCRIPT
# filename: "install.txt"
# Simple Update Script
#### set important variables...
set
VENDOR MyCompany
set
APP
MyApp
set
VER
1.00
set UPDATE_LEVEL 1
#
define the APP VER VENDOR and UPDATE_LEVEL
set REGHOME "SOFTWARE\$VENDOR\$APP\$VER"
# see
the location
of entries in the registry
set NO_UNINSTALL TRUE
#
prevent
the generation of an Uninstall Script -
# there will already be an UninstallScript from the previous full
Install,
# if you add new files they will still be removed by the Uninstall
Script
# provided they are placed under $HOME
#### display information on the
screen...
banner -l "$APP version 1.00, UPDATE: $UPDATE_LEVEL "
"Times New
Roman" 320 255:0:0
banner -l "(c) $VENDOR Ltd, YYYY"
"Times
New Roman" 240 255:0:0
#### test if the application is
installed...
getreg -lm "$REGHOME" "Home" HOME
if "$HOME" == "(empty)"
message "The application is not
installed, and
so cannot be updated"
cancel
endif
#### get the current update level of
the application...
getreg -lm "$REGHOME" "UpdateLevel" CURRENT_UPDATE_LEVEL
if "$CURRENT_UPDATE_LEVEL" != "(empty)"
if "$CURRENT_UPDATE_LEVEL" <
$UPDATE_LEVEL
query -y
RESULT
"the update you are trying to install is less than the one already
installed"\
"DO YOU WANT TO CONTINUE WITH THE UPDATE?"
if $RESULT !=
"YES"
cancel
endif
elseif "$CURRENT_UPDATE_LEVEL" ==
$UPDATE_LEVEL
query -y
RESULT
"the update you are trying to install is already installed"\
"DO YOU WANT TO CONTINUE WITH THE UPDATE?"
if $RESULT !=
"YES"
cancel
endif
endif
endif
#### give the user a chance to quit...
query -y RESULT "Do you want to continue with the
update"
if $RESULT != "YES"
cancel
endif
#### update the files and registry...
setreg -lm "$REGHOME" "UpdateLevel" $UPDATE
copy "UpdatedExe.exe" "$HOME\OldExe.exe"
copy "UpdatedDll.dll" "$HOME\OldDll.dll"
# if either of these files are in use, a copy operation
# will be scheduled for the next reboot, and the user
# will be told a reboot is required, however the system
#
will not be rebooted by InstallScript
banner -l "Update Completed" "Times New
Roman"
240 255:0:0
5. Automatically Generated
Uninstall Script
The following (uninstall) script is the one actually generated when ComBridge
(another product from Octatec) is installed under WindowsNT or
Windows2000.
The commands are all fairly obvious apart from the 2 run commands
(highlighted in italics). ComBridge installs a service, ComBridgeService.exe.
For
the uninstall to complete, the service must be stopped and removed.
InstallScript
does not know how to do this, so you must tell it - you do this using
the
onuninstall
command. The following lines are taken from the ComBridge installation
script, and show the service being installed - the important lines are
highlighted in italics.
run
"$HOME\ComBridgeService.exe"
-i
#
the service installs itself
onuninstall "run
'$HOME\ComBridgeService.exe'
-x"
onuninstall "run
'$HOME\ComBridgeService.exe'
-u"
# arrange for the service to be stopped and uninstalled
# when the uninstall script runs
query -y RESULT "Do you want to
start the
service now"
if $RESULT = "YES"
run
"$HOME\ComBridgeService.exe"
-s
# the service starts itself
endif
query -y RESULT "Do you want to
automatically
start the ComBridge Service at boot time"
if $RESULT = "YES"
setsvc -a
"ComBridgeService"
#
installscript is able to set the start-state of a service using the
setsvc
command
else
message "You will
have
to start ComBridgeService from the Control Panel each time you boot"
endif
The ComBridge service is written to support several arguments, -i =
install the service, -s = start the service, -x = stop
the
service and -u = uninstall the service - other services may or
may
not support similar command line functionality it's up to the
implementer
of the service, but it's a good idea if your service can
start/stop/install/uninstall
itself, this certainly makes life easier when installing and
un-installing
since there is no command line method of doing this that you can rely
on
(the windows sc command controls services from the command
line,
but it has to be explicitly installed, and so may not be present )
# automatically generated
uninstall
script
background 255:120:120
banner -c "Uninstall ComBridge" "Arial"
240 255:255:255
title "UNINSTALL ComBridge"
oktouninstall "ComBridge"
run 'C:\Program
Files\Octatec\ComBridge\ComBridgeService.exe'
-x
run 'C:\Program
Files\Octatec\ComBridge\ComBridgeService.exe'
-u
rmkey -lm
"Software\Microsoft\Windows\CurrentVersion\Uninstall\ComBridge"
rmregtree -lm "SOFTWARE\Octatec\ComBridge"
rmtree "C:\Program Files\Octatec\ComBridge"
rmprogmenu "Com Bridge\Documentation"
banner -c "... completed" "Arial" 240
255:255:255
If you have other uninstall requirements that are not catered for in
the
automatically generated script, you can handle them by adding onuninstall
commands to your install script.
TestScript
Provided you didn't excluded the test files when installing,
you
will have a test directory containing a test script file test_script.txt.
To run this script, start InstallScript and select test_script.txt
from the file-open dialog. The script tests several features, but
concentrates
on DLL reference counting, the replacement of running EXEs and
the
removal of directories that contain EXEs that are in use.
Setting up a Self Extracting EXE
Installation
NOTE: If you use ISbuilder, building the SXAzip archive is done for
you,
and you don't need to worry about this.
If you are setting up an SXAzip archive manually, in addition
to your
application files, you will need to include the following 4 components
in your archive...
-
the setup.exe program
-
the InstallScript.exe program
-
your install script, named install.txt
-
the unsetup.exe program
NB: if you use ISbuilder to
create your
Installation package, you don't need to worry about this, it is all
done
for you.
Setup.exe is the program that must be run to initiate
the installation
- it calls InstallScript.exe and waits for it to complete
before
returning. Don't try to omit Setup.exe and run InstallScript.exe
directly
- it will not work - this is because InstallScript.exe
requires
a Licence Key to run, however Setup.exe provides InstallScript.exe
with
a temporary 'licensed' environment in which to run, so that clients
installing
your software don't have to licence InstallScript as well. The unsetup.exe
program is required during the uninstall procedure - it will be
automatically
copied to an uninstall directory, you don't need to specify it in the
InstallScript.txt
commands - InstallScript then sets the system registry so that your
application
can be uninstalled from the Control Panel's Add/Remove icon.
The simplest way to generate a self extracting exe
installation package
is to use SXAzip. also from Octatec. You could use any archive
generation
tool that supports
the running of a program after archive extraction. However, you may
have a problem - InstallScript may not be registered on the system
where
the archive is being
extracted. This isn't a problem if the InstallScript is contained in
an SXAzip archive, as SXAzip temporarily registers InstallScript while
it is processing an installation,
but other archive generation programs won't be able to achieve this.
Briefly, SXAzip adds files to a compressed archive, and then,
will extract
all the files on the archive and run a pre-defined program contained on
the archive. The user is, of course, prompted before any installation
takes
place. SXAzip is an interactive program, but to make the creation of
Installation
archives easier, it reads commands form a very simple script-file.
Follow
the link above for full information.
|
