|
HOME | DEMO
| SMALL BUSINESS LEDGER | BUY NOW |
| SBpayroll (c) 2001-2006 Octatec Ltd | |
| The Small Business Payroll system is an extremely
easy-to-use payroll system designed for use by the one-man company (maybe
an IT contractor) or small business. There is, in principle no limit to
the number of employees SBpayroll can handle, but between 1 - 10 is probably
optimal. The application is intended for U.K. business, and while we are
happy to sell it to anyone, it will not be appropriate for you to use it
in other countries tax regimes - but if you want an insight into the U.K.
income tax system, then fine. SBpayroll is available in Standard
and Multiple Enterprise Editions, The Multiple
Enterprise Edition allows you to create multiple companies and
administer PAYE independently for each company.
SBpayroll is closely related to SBledger the Small
Business Ledger application, which is particularly useful in producing
your VAT returns. You can easily configure SBpayroll to automatically
add salary items to SBledger.
Contents
Summary: This is a payroll system designed for the small business.
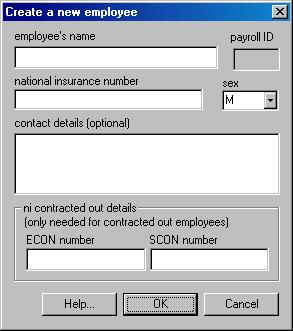
Getting StartedAfter installation just double click the SBpayroll icon (or take the Start/Programs/SBpayrol menu option). You will be told that "SBpayroll is starting for the first time and you must create a new employee". You will be presented with the following dialog...
Main Application FormOnce an employee has been created you will see the following main application form. You can freely switch between monthly and weekly paid employee by using the check-box, probably, you will choose monthly, which is the default.
This form provides all the information required to account for an employees salary tax and national insurance. It is based on the P11D working sheet, so will probably be quite familiar to you. The only columns that can be edited are the ones in white - each time you change a value, the form is automatically re-calculated to show you the correct position. If you don't have different values each month (and you probably don't) you can just enter the default values at the top right-hand corner and then use eithe the apply button (diagonal down-arrow) to enter the defaults into the next available row or use Edit/Fill Whole Grid With Defaults menu option to see the position for the whole year, then if the salary or tax-code changes latter in the year, just enter the new values directly into the grid. That's really all there is to it. The blue column shows the net amount to be paid to the employee each month (or week). If you have the annual gross salary value and don't want to be bothered working out the monthly or weekly value , enter the annual figure and use the quick calc divide button To see how much needs to be paid to the Inland Revenue each month (or each quarter) for all employees in the system, use the Tools/All Employee Payment Summary menu option to display the Payment Summary. To see what figures go into your P35 at the end of the year, take the Tools/Annual Payment Summary to display the Annual Summary If you want to create a Payslip, take the Tools/Payslip menu option. You can select the National Insurance Category (NI Table) from the drop-down. The default is A, other categories are supported, and are mostly for contracted-out employees/employers. If you un-check the monthly paid employee flag, you will get weekly periods - the application only supports monthly and weekly payment periods. As an aid to remembering when you make a payment to an employee, you can mark a row as 'paid'. Using the right-click context menu. This has the effect of turning the white columns grey and preventing them from being edited, and making the Net Pay column bold. If you have marked a row as being from previous employment you cannot mark it as paid, and vice versa. Adjusting the size of the grid: The grid is tied to the size of the form window. If you increase the size of this in the normal way. the grid will automatically expand to fill the available space. The columns, however will not change their width automatically, you can either change the columns you want manually or take the View/Equalize Column Widths menu option, and the grid will re-size its columns equally to use all available space. You can display this form in summary view; quarterly-summary
is
available for monthly-paid employees and monthly or quarterly-summary
is available for weekly-paid employees. These views just summarizes the
data - to work out your monthly or quarterly payments to the revenue, use
the All Employee Payment Summary.
Password ProtectionYou can set up the application so that it requires a password to start, thus preventing unauthorized access to your data. To do this, close all open forms and take the File/Enable Password Protection option. You will then see a dialog, check the ‘enable password protect’ check-box and you will then be able to choose a password. Once you have done this you will be required to enter the password whenever you start the application. (do not forget your password or you will have extreme difficulty accessing your data).Dealing with New StartersWhen a new employee starts, unless it is the beginning of the tax year, you must record the payment made in the previous employment so that the correct tax and NI liabilities can be calculated for the employee. However, you do not want to include these figures in any of your own liabilities. You achieve this simply by making one or more entries in the grid to represent the previous employment, and then use the Edit/Mark as Previous Employment menu option. This will turn the Gross Salary and Tax Code entries black. All such rows will be excluded from the Payment Summary and the Annual Summary.It is fairly likely that you will have to deal with new starters on a week1/month1 basis, this will be certainly the case if they don't have a P45 The above menu option presents a dialog which gives you the opportunity to override the calculate tax value with the one from the P45. The tax paid value from the P45 should match the value automatically calculated by SBpayroll, however, if the employees tax was not calculated correctly or not paid correctly in the previous employment, the figures might not match. If the figures don’t match, you should use this facility to override the calculated tax due with the amount actually paid taken from the P45. In this way, the employees future tax position is calculated correctly.(When the calculated tax amount has been overridden, it is displayed in an italic font.)
Zero Payment AmountsIf you have cause to not pay your employee one month (or week), this is problematical for the system. Rows with zero gross payment amounts are considered empty and will not be included in the calculations until a non-zero payment is made the following month (or week). However, this is too late, as the employee will probably be due some tax to be refunded as his ‘free-pay-allowance’ will increase in the month he receives no pay, so he will have paid too much tax for the year at that point.To get round this problem, you can specify that zero amounts are always calculated. You do this on a per-employee basis from the View menu. There is no disadvantage in having this mode set permanently, other than the cosmetic appearance. NB: The ‘apply to next empty row’ button will not realize that you intend a row to be zero, so if you make a zero payment one week (or month) you will have to enter the next none-zero payment manually by typing in the required cell rather than by using the ‘apply to next empty row’ button. Once the zero amount is no-longer the last payment, the ‘apply to next empty row’ button will find the correct ‘next empty row’
Dealing with SMP, SSP, Tax Credits and Student Loads and Other Deductions
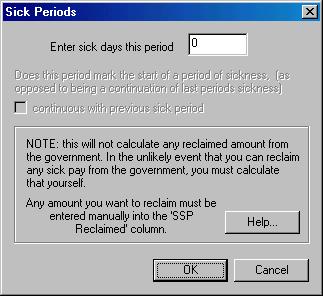
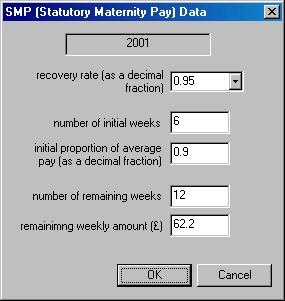
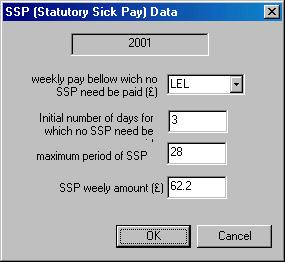
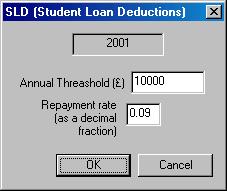
There are SMP(statutory maternity pay), SLD(student load deduction) and SSP(statutory sick pay) calculators available from the Edit Menu to help you deal with these items. Note: once you have used one of these calculators on a row, you will not be able to use a calculator again on the same row unless the row has been cleared using the Edit/Clear Current Row menu option. SMP/SLD/SSP CalculatorsSMP CalculatorTo use the SMP calculator, select a row in the grid and then take the SMP calculator option from the Edit menu. You will be presented with a dialog displaying the amount of SMP and the amount you can reclaim from the government. If you accept these amounts, they will be entered in the grid, a text flag "[M]" will be added to the User Notes column(you will not be able to remove this flag). To clear the SMP entries, take the Edit/Clear Current Row menu option. The salary value used to calculate SMP is the default value at the top of the form. SSP Calculator
SLD Calculator
Extra ColumnsYou can use the calculators above to fill in the SMP reclaimed and SLD columns, or fill them in manually.SMP reclaimed and SSP reclaimed columns
Student Loan Deducted
Tax Credit Paid
Tax credits are shown on the Payment Summary and are deducted from the amount shown that is to be paid to the Inland Revenue. (The Payment Summary has a check-box that allows you to temporarily display the amounts without the Tax Credits deducted – this is just for informational purposes only) This column also appears on the Annual Payment Summary., however, on this summary Tax Credits are not deducted from the tax totals, as this summary is intended to show the employee’s tax position for the year - P60/P35. (There is also, however, a check-box that allows you to temporarily display the amounts with the Tax Credits deducted – this is just for informational purposes only) Tax credits are also shown on the payslip, but are not deducted from any tax shown, they are merely added on to the net pay due Other Deductions (Stakeholder Pensions)
NOTE: It is important to remember when filling in these columns that it is the actual amounts to deduct or add that should be entered not the amount paid to the employee. The SMP/SLD calculators will, of course, do this correctly for you. Current links for more information on SMP, SSP, Student Loans and tax credits can be found in the Links section.
Tax Codes and month1/week1 basisThe following tax codes are supported by the system (note L represents any letter and 999 any number)
Any code can be operated on a week1/month1 basis by putting an X in front of it. When the system sees a tax code starting with X, it does not work out tax due on a cumulative basis, rather it works out the tax due as if it had been deducted in week 1 or month 1. This facility is most likely to be needed when dealing with new starters.
Summaries And ReportsThere are 2 summary reports that are accessed from the Tools menu. These summarize the payments for all employees on a period or annual basis. The first is ideal for making your monthly or quarterly payments to the Inland Revenue, whereas the second is designed to provide the information needed when filling in your annual P35 form(s).All Employee Payment Summary
Hopefully, this summary is self explanatory, it can be produced on a monthly or quarterly basis, choose the period to match whichever you use when making payments to the Inland Revenue. The column is red shows you what you need to pay. The summary is produced for all employees that are open in the application not all employees in the system - this allows you to filter the summary if you want. If you do not have all employees open in the application, you will be prompted to do this if you want when the summary starts. As an aid to remembering when you make a payment to the Inland Revenue, you can mark a row as 'paid'. Using the right-click context menu. This has the effect of turning the white columns grey. The check box at the bottom (greyed-out in this example), allows you to specify that the Period-Tax column (and hence the Tax + Nics column) is displayed without Tax Credits already subtracted. If you are paying Tax-Credits, the period tax column and the Tax + Nics column show with the Tax Credit already included. The reason for this is that this display is intended to show you what you actually need to pay the Inland Revenue each month (or quarter). However, for reporting purposes, you may want to see the figures before Tax Credits have been included. This check box allows you to do this. Note: the check-box is greyed-out if there are no Tax Credits, and always displays in its default state of checked when the dialog opens up. Annual Payment Summary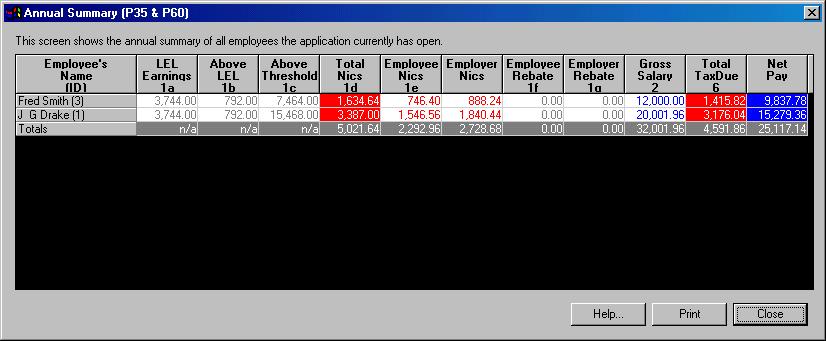
This summary just shows each employees position for the year, and the totals for all employees. The information is needed on your P35 form, and on the employees P60. A screen image of the P35 or P60 is not shown, as this single dialog displays information for both. The P35 basically requires the totals for each employee and a grand total for all employees, the P60 requires a more detailed split of the NI contributions. Again, the summary is produced for all employees that are open in the application not all employees in the system - this allows you to filter the summary if you want. If you do not have all employees open in the application, you will be prompted to do this if you want when the summary starts.
Link to SBledger
To do this, close all employees and take the File/Configure External Interfaces menu option. NB release 2.1 or higher of SBpayroll is required to take advantage of this functionality. This menu option displays the Configure External Interfaces dialog box. If the Send to SBledger box is checked, whenever you mark a payment as paid SBledger is started (if it is not already running); an expenses page that matches today’s date is opened and a salary item containing the correct value is created. You can decide what ‘bank’ and ‘expense’ columns in SBledger are actually filled in, but probably, the default values for these will be what you want. (If you do change these, the names you enter here need not be an exact match to a column name, they just need to appear somewhere in the column name )
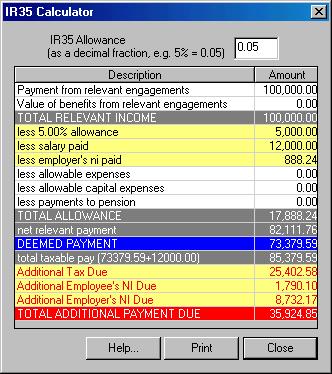
IR35The application includes an IR35 calculator you can use if you are unlucky enough to be covered by the IR35 legislation.
Memo PadThis facility, available from the Tools/Memo Pad menu allows you to enter notes to remind you of tasks you need to perform. A checkbox on the memo-pad allows you to arrange for the pad to appear at application start-up
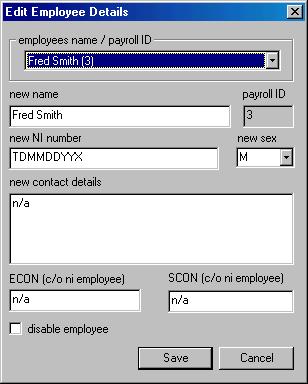
Editing Employee Details
National Insurance CategoriesThe NI category of an employee is set from the main window form. You can set this to a different value and see the grid update immediately to reflect the new category. The following NI categories are available from the drop-down list on the form...
There are 2 C categories, one for contracted out (C) and one for not-contracted
out (c). Note: you should probably not use code C
or c from 2003
Note: the X category is not a true NI category, it actually means class 2 Self Employed contributions paid at a flat weekly rate - this value can be entered from the Static Data dialog, however, SBpayroll will be installed with the correct value already configured. If you are self employed it is likely you will also have to pay a percentage of you profits as NI as well at the end of the year. The Z category just applies zero nics - this doesn't imply it is ever valid to have zero nics! DirectorsDirectors can be treated differently because, for example, they may pay themselves 10% of their annual salary in the 1st month and nothing more until the last month. However, it certainly makes life a lot simpler if you just pay yourself a monthly salary like any other employee. The rules have recently changed, so even if you don’t pay yourself at regular intervals, you can still account for income tax and NI as if you did, making things a lot simpler. SBpayroll only supports weekly or monthly payment periods.
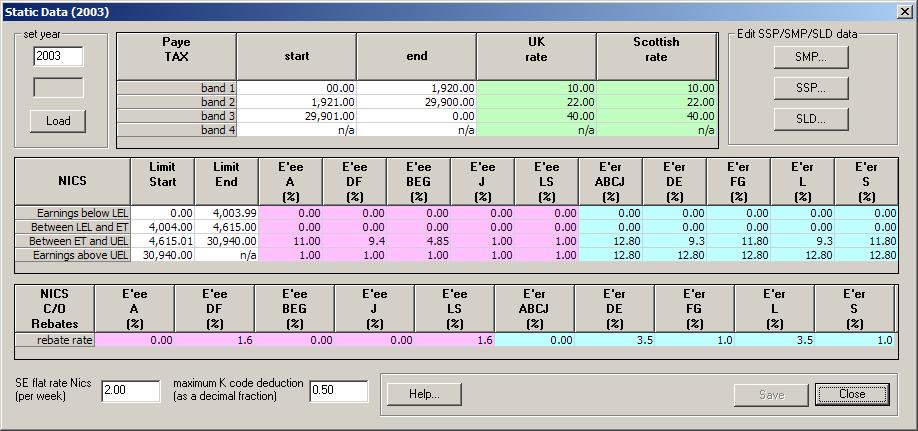
Static DataThe first thing to note is that it is very unlikely you will need to edit static data. Static data comprises the Tax and National Insurance rates and thresholds. This data is supplied with the application, and Octatec currently provides downloadable updates of static data each year, available for a nominal charge.Editing Static DataThe following dialog is available from the File/Static Data/Static Data… menu option, this option is only displayed when all the Main Forms are closed.
The "Edit SMP/SSP/SLD" buttons give rise to the following dialog
boxes; these data is used in the calculation of SMP,
SSP and SLD.
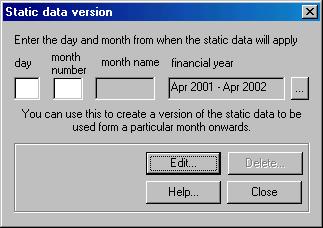
Static Data VersionsThe following dialog is alseo available from the File/Static Data/Static Data… menu option, this option is only displayed when all the Main Forms are closed.
When using the above dialog, the browse button (...) allows you to select existing versions of the static data and edit them or delete them. NOTE: For 2002 the application shipped with the basic static data and a version of the static data that applies from 17th June, as the tax thresholds changed on that date. If you are trying to create a version of static data for a future year, you should note that you will not be able to create a version of static data until you have created the basic static data for the year. If records for any employee have been marked as ‘paid’, you will not
be able to create a version of the data for that period or edit an existing
version. (It is, however, possible to remove a ‘paid’ marker from a record.)
Supporting multiple companiesThe standard edition of SBpayroll supports one company only, I.E. all employees are treated as if they belong to the same organization for reporting purposes etc. There is, however, a Multiple Enterprise edition that allows you to create multiple independent companies, employees are then create relative to a particular company, and so you can generate separate reports for each company. This functionality is intended for the small independent account who might be doing the payroll for several of his/her clients. The Multiple Enterprise edition costs slightly more, but if you have more than one company to deal with, it is the ideal solution. NB, the downloadable demo is the standard edition, the Muiltiple Enterprise edition is essentially the same except it allows you to create different companies and associate employees with a company.When you start the application a company called 'Default' is automatically created. At any one time, SBpayroll has a 'current working company', the 'Default' company automatically becomes the 'current working company' when the application is started for the first time. The current working company name is shown in the status-bar at the bottom of the screen and in the title bar of the various forms and dialogs within the application, so you always know which company you are dealing with. All employees you create are automatically associated with the 'current working company' and all reports (payment summaries) are automatically limited to employees of the 'current working company' (as with the standard edition, the payment summaries only include open/displaying employees, but when you open all employees, you only actually open all employees for the 'current working company') Changing the company name You can change the name/registration number/address of the 'current working company' using the File/ Edit Company Details/ Current Company details... Menu option. This option always works on the 'current working company'. Adding new companies You can add new companies from the File/ Edit Company Details/ Create New Company... Menu option. You can only access this menu option when all employee records are closed. The menu presents a dialog box into which you can enter the name/registration number/address of the new company. There is also a check-box which enables you to force the new company to become the 'current working company'. If you don't check this box, you can change to the new company latter as described bellow. Selecting different companies to work with You can change the using the 'current working company' using the File/ Edit Company Details/ Set Working Company... Menu option. You can only access this menu option when all employee records are closed. If you only have one company, you will not be able to change to a different company, of course. You cannot open the records of employees in different companies at the same time, you can only open employee records from the 'current working company'. Once all employee forms are closed, you can use key F1 to access this functionality quickly. Deleting a company You can delete a company using the File/ Edit Company Details/ Delete A Company Menu option. You cannot delete the current working company. If you delete a company you will not be able to access any of the employee records relating to that company. You can only access this menu option when all employee records are closed. Static Data The static data (i.e. Tax and NI rates and thresholds) is shared by all companies. You cannot set different rates for different companies - it is unlikely you will want to do this, as the same rates apply equally to all companies. Reinstating or Expunging deleted companies Although you are warned about losing data when you delete a company,
you can undelete a company relatively easily. Assuming the application
is installed in
We do not recommend you delete companies and then undelete them as a matter of course, but if you do delete a company and then realize you need the data after all, there is a solution. It follows from this that if you delete a company to try and get more disk space this won’t free any disk space. You must actually expunge the companies data. To do this, manually delete the directory –data_XX using Windows Explorer and then clean out the recycle bin, but note: if you do this, the data really will be lost!
Information for accountants and auditorsHow do I know what rates and thresholds are being used?To determine the rates used at the start of the year, close all open forms and take the File/Edit Static Data/Static Data menu option. This will show you the starting rates used. This is the applications 'static data'. The rates thresholds can change throughout the year, such changes create versions of the static data which are used from a particular starting date. To see these versions (if there are any), take the File/Edit Static Data/Versioned Static Data menu option. You will then get a dialog that lets you list and view all the static data versions. Use the browse button (…) to view the versions of static data available. How can I check the calculations performed? For each employee, there is a ‘calculation’ log which with the same name as the employee and a .log extension. These files are located in <installation folder>\Octatec\SBpayroll\1.00\data. These logs record in detail the calculations made by the application. If you want to check the IR35 calculations, an IR35 calculation log is also produced, with the same name as the standard calculation log, but with "IR35" at the start of the name. NB: if you are using the Multiple Enterprise Edition,
the logs will be written to a folder named data_XX, where
XX
is the ID of the company. The ID is a small number allocated by the application
to keep track of companies. You can see the ID of a company by looking
at the dialog displayed by the File/ Edit Company Details/ Set Working
Company... menu option.
Export To ExcelAll the data grids that are displayed can easily be exported to Excel or any other spread sheet in the form of a CSV file. This is achieved by simple menu options or dialog buttons. Also, all the grid displays can be copied to the clipboard in a format that can be directly pasted into Excel.
Linkshttp://www.inlandrevenue.gov.uk/employers/rates_and_limits.htmGeneral link for rates http://www.inlandrevenue.gov.uk/employers/ni_rates_table.htm
http://www.inlandrevenue.gov.uk/rates/nic.htm
http://www.inlandrevenue.gov.uk/rates/it.htm
http://www.inlandrevenue.gov.uk/employers/
http://www.inlandrevenue.gov.uk/employers/starting_tax_year.htm
http://www.inlandrevenue.gov.uk/employers/employee_sick.htm
http://www.inlandrevenue.gov.uk/employers/employee_pregnant.htm#4
http://www.inlandrevenue.gov.uk/rates/taxcredits.htm
http://www.inlandrevenue.gov.uk/ebu/testdata.htm
http://www.inlandrevenue.gov.uk/pdfs/ir175.htm
http://www.inlandrevenue.gov.uk/pdfs/ir2003.htm#1
http://www.pcg.org.uk
http://www.contractoruk.co.uk/
http://www.parliament.the-stationery-office.co.uk/pa/ld199900/ldbills/106/00106--t.htm
http://www.opas.org.uk/TypesOfPensionScheme/occupationalPensionSchemes/
http://www.dwp.gov.uk/
http://www.thepensionservice.gov.uk/
Menus and ToolbarsToolbar ButtonsThe toolbar triggers the following functions
Menu StructureThis menu structure is only available when one or more employee window are being displayed. Most of the menu options are self explanatory, where am explanation is needed , that is in green to the left of the menu item.
Right Button Context Menu
Application File MenuThis menu is available when no employee window are being displayed, i.e. close all employee forms first and then go to the File menu.
Integration with Other SystemsPassing data to downstream systemsSBpayroll can be configured to integrate with any other system. SBpayroll will pass the individual payment records of an employee to downstream systems when an employee's record is marked as paid. It will also pass on Summary Payment records when they are marked as paid (If integration is enabled records marked as paid cannot be marked as unpaid). In this way payment data could be passed to a database, an accounting system and/or an electronic payment system.Integration is configured through the application File/Configure External Interface menu option. To configure integration you simply give the name of a COM object that SBpayroll will call when payments are marked as paid, and check the check-box to tell the system to actually use the interface. If you need to interface with another system you will have to write the COM object yourself, however, A sample com object, including source code, SBpayroll.Interface, (SBPinterface VC++6 project) is distributed with the application. When employee records are marked as paid, SBpayroll will call the following method on the object [id(1)] HRESULT PayEmployee(long versionID, BSTR name, long payrollID, BSTR niNumber, BOOL monthly, long thisPeriod, long numberOfFields, BSTR fields, [out,retval]long *result); When a Summary Record (i.e. monthly/quarterly payment of employment/employee taxes) is marked as paid, the following method is called [id(2)] HRESULT PayGovernment(long versionID, long thisPeriod, long totalPeriods, long numberOfFields, BSTR fields, [out,retval]long *result); Both methods return a result indicator in an output parameter, 0 = OK. If an error occurs this method is called and the error text is displayed [id(3)] HRESULT GetErrorText([out,retval]BSTR *text); NB versionID is currently always 0 and fields contains comma-separated fields as they appear on the grid (all possible fields are present, including all ‘extra’ fields). Your object can then make whatever calls it needs to make, to whatever system. to pass on the data. If you are using the interface you will not be able to undo payment
marks, once the data has been sent to the down-stream system. Also, if
the down-stream system returns an error, the payment-mark will not be permitted.
This is required to maintain overall integrity.
Receiving Data from other SystemsSBpayroll exposes a COM interface as follows to enable other systems to create employee records[id(1)] long CreateEmployee(BSTR name, BSTR niNumber,
short sexIndicator, BSTR contactDetails, BSTR econNum, BSTR sconNum);
[id(2)] long LookupEmployee(BSTR name);
[id(3)] boolean SetEmployeeDefaults(long id, long year,
short niCategory, BSTR taxCode, double grossPeriodsSalary, boolean monthlyPaidFlag);
A Sample application that uses this interface is distributed with the
application (SBapiTEST VC++6 project).
|