| HOME | DEMO | BUY NOW | INSTALL SCRIPT |
| SXAzip (c) 2000-2006 Octatec Ltd | |
SXAzip is an easy-to-use program that creates
Self eXtracting Archives. A compressed archive is created and embedded
in a WIN32 executable. Files are then extracted by simply double-clicking
the archive file.SXAzip is ideal for distributing software, and is specifically
designed to work with InstallScript (If you purchase InstallScript, SXAzip is included free of charge, however SXAzip is also available for purchase separately) SXAzip can be used for either personal
backups or system backups, and has a Script Driven interface and an ActiveX
Automation Interface.
Contents
Summary: SXAzip enables you to create Self Extracting Archives for use in distributing software or for personal or system backups.
Typical Uses For SXAzipSXAzip is typically used for the following purposes....
Features Of SXAzipThe SXAzip archive has the following featuresSoftware Installation / Self ExtractionFirst and foremost, SXAzip is designed to produce Self eXtracting Archive used for software distribution and installation. Archives can be created so that when they are extracted, a user defined program contained in the archive is executed - this is usually setup.exe, but need not be. NOTE: the user who extracts the archive is always told that the setup program is about to execute, and given the option not to execute it.Script File ProcessingSXAzip interprets a very simple script files that allows system or personal backups to be easily repeated, with the archive written to date stamped files. If SXAzip is started with a single command line argument, that argument is expected to be the name of a script file - script files executed in this way do so silently, without a window, however a date stamped error log is produced. The script-processing functionality also makes the production of a setup archive easy by recording all the files and options required. To run an SXAzip from the command line, issue the command "SXAzip <path-of-script-file>".Disk SpanningIf you are creating an archive on a floppy disk, the archive can span multiple disks. The archive creator is automatically prompted to insert the next (formatted) disk, and the archive extractor is automatically asked to provide the next disk in the archive. Their are no problems self-extracting multiple volume floppy archives, but, as with all SXAzip archives, you have the choice of self-extracting them or using the SXAzip application to browse and/or extract them.The disk spanning feature is designed to work with floppy disks, and their are problems self-extracting archives that spans Zip drives. The problem is, that the operating system treats large removable drives more like fixed drives than floppies, and will occasionally access the disk image of running executables. If the archive requires a 2nd disk, you will remove the disk that contains the executable! When this happens and the operating system decides it needs the disk, it will put up a blue screen prompting for the disk. Although this is not very elegant, in fact, if you insert the original disk in the drive and hit return (twice) the system continues OK. HOWEVER, this is not recommended. If you have multiple ZIP disk archives, you should not use the self-extraction functionality, and instated use the File/Extract-Browse option from the SXAzip application Development Project BackupThis feature allows a Project Backup mode to be selected from the menu. In this mode all VisualC++ Generated project files are ignored, this includes files with the following extensions
Note: this list of extensions is configurable by editing the 'exclusion string' displayed in the Edit/Preferences menu. The string is a colon separated list of file extensions, and is, by default, "exe:obj:res:tlb:pdb:sbr:bsc:ilk:ncb:opt:plg:aps:idb:pch". It is stored in the registry key HKEY_LOCAL_MACHILE\SOFTWARE\Octatec\SXAzip\1.00\IgnoreFiles. Optional CompressionUnder normal operation, all files added to the archive are compressed, however, this feature can be disabled from the menu. You might want to do this if the files being added to the archive are already compressed.Data VerificationOptionally, after creating an archive, it can automatically be read and verified. By default, archives are always verified.Extract Files to Alternative Locations.When extracting files from an archive you have 3 choices as to where to put them
Password Protection and EncryptionThe archive can be optionally protected with a password and encrypted. The encryption is not particularly strong, it is sufficient however, to stop most people from viewing your archive, but it isn't suitable for protecting valuable company secrets. A word of warning, however - if you forget your password and your archive is encrypted, you have effectively lost your data! Note: the encryption algorithm increases the size of the data, and for this reason if you decide to encrypt your archive, it is automatically compressed as well.Automation InterfaceSXAzip exposes a simple automation interface allowing other applications to create and extract archives, see bellow for the description of the Automation interface supported.Multiple Ways Of Adding Files To ArchivesSXAzip allows files and directories to be added to an archive in any of the following ways
Activity Log and Error Log FileWhenever SXAzip is used, an activity log file named SXAzip.log is create in %TEMP%. If %TEMP% is not set %TMP% is used instead, if %TMP% is not set the log file is created in C:\TEMP, if there is no C:\TEMP directory, no log file will be created. Also, if processing a script file passed on the command line serious errors are written to a date-stamped file SXAzip_DDMMYYYY.err located in the same directory - the error log is maintained instead of displaying errors on the screen. Note: the activity log can be disabled using the Edit/Preferences menu.
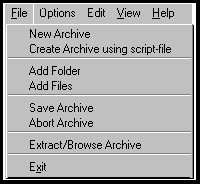
The User InterfaceSXAzip presents a standard WINDOWS user interface. Archives are created and extracted using the File Menu. and Options are set using the Options menu. These are the only menus of any real importance.Archive ManipulationArchives are created (and optionally viewed and extracted) by using the File menu displayed below.. Hopefully, the menu items are self explanatory. Note: all archives are self extracting, but as an alternative to using the self extraction capability, archives can be view and extracted using the "Extract/Browse Archive" option.
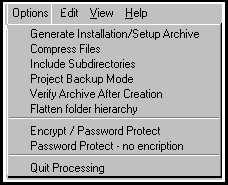
Option SelectionOptions are set, not surprisingly, set using the options menu. Some options cannot be set set once an archive has been created, and these are greyed out accordingly.The options should be mostly self explanatory. It should be noted that the "Quit" option is only available while files are being added to the archive, and selecting it will quit from the current file addition operation.
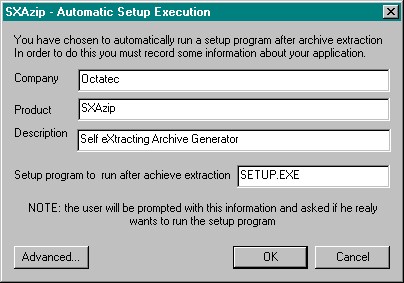
Creation of a Setup ArchiveIf the "Generate Installation/Setup Archive" option is selected, the following dialog is displayed. NB: this option becomes greyed out once an archive has been created with New Archive menu option; this is because SXAzip needs to know that you are going to create an Installation archive before your actually create it. This option arranges for a SETUP program to be run automatically after an archive has be self-extracted. Note, however, if you are creating a setup archive, it is probably more efficient to record this information in a script file together with all the files required by the setup. When a setup archive is created you will probably find it easier writing the actual SETUP program if the files are added to the archive without any path-information using the Flatten Folder Hierarchy option (+F when scripting). When the setup archive is 'executed' the files are extracted into a temporary directory and SXAzip runs the named SETUP program. After the SETUP program has completed, the temporary directory and all files in it are removed. There is, however, one complicating the factor: the SETUP program might run another program to do the actual work and exit. If this is the case you can use the Advanced button to specify an alternative program to wait for, rather than the one that is executed by the archive. The setup program that Install Shield uses works this way. If you are unsure, you can use the Advanced button to disable the automatic clean-up facility; if you do this, the files extracted from the archive will be left on the system in a temporary directory named __SXA_tmp_N__.(Note: this is not a problem if you use InstallScript as the setup program)
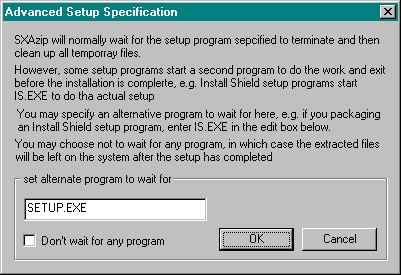
The Advanced button displays the following dialog.
Note: if you are using a script to create the setup archive, the above information can be entered using the : directive. Tip: if you are planing to create a setup archive, use InstallScript to quickly and easily produce an installation script. SXAzip and InstallScript where designed from the start to work together. Archive Browse and ExtractionWhether the archive is being self extracted or if the SXAzip program itself is being used to browse / extract an archive, the following dialog is displayed. There is, however, one exception to this, a somewhat different dialog is displayed if the archive is a Setup Archive and a SETUP program is going to run - this dialog is shown in the next section. By default, the files are extracted to the same location as on the archive. However, you can extract then to any location, and the file hierarchy will be created in that location - alternatively, you can choose to flatten the hierarchy and extract the files, excluding the path information. Right clicking on a selected file allows it to be viewed or extracted.
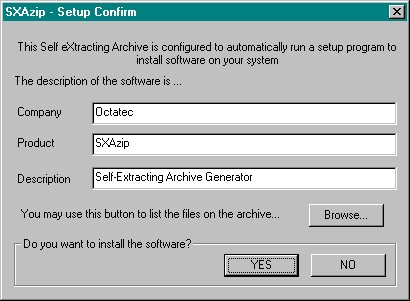
NOTE: if you want to search for a particular file, just press F3, you can then enter part of a file name or the whole file name, and the list will be searched for it. Execution Of a Setup ArchiveAfter executing a setup archive, you will see the following dialog. You may browse the archive, but you may not extract the files from the browse menu. The only way to extract the files is to select the Yes button.
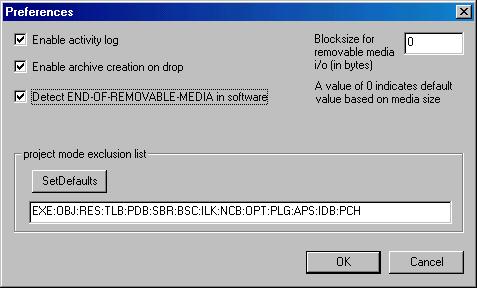
PreferencesThe preferences dialog box can be accessed from the Edit Menu. Mostly, you will not want to change any of the preferences, and if you don't understand a preference, leave the default, as displayed below.
Enable Activity log
Enable archive creation on drop
Detect End-Of-Media in software
Block size for removable media i/o
Project mode exclusion list.
Script File FormatSXAzip has the ability to process simple script files, simplifying the task of backing up specific files and directories and creating Setup archives.The first character of a script file is the command character. Any line
that does not start with a command character is assumed to be the name
of a file or directory.
The following are the valid command characters #
comment, lines starting with this character are ignored
The !( Directive
Renaming files as they appear on the archiveThere is a way to rename a file when it goes onto the archive, the syntax to achieve this is as follows...(pathname-stored-on-archive)=pathname-of-actual-fileE.G. if you want to store a file called c:\testprog1\version_2.exe as c:\application\program.exe on the archive, just add the following line, but note: spaces are not allowed around any of the ( ) = characters. (c:\application\program.exe)=c:\testprog1\version_2.exeNote: this only works with single files, and not directories. There is no facility to give files a different name on the archive except when processing scripts as described here - you cannot do it from the user interface. This facility is of most use if you are flattening the pathnames when you save them onto the archive, and have more than one filename that is the same. Note: ISbuilder (the InstallScript Wizard) uses this technique to ensure files of the the same name do not overwrite each other when extracted from a flattened archive). Archive pathname InterpretationThe > command interprets the following characters in a pathname in a special way$ US format date (MMDDYYYY) # UK format date (DDMMYYYY) ~ general date format (YYYYMMDD) % The current system time (HHMM) @ The Computer name * The current user name The purpose of this is so that SXAzip can run the same script, once a day or once a week, and produce differently named archives, perhaps backing up to a central server. E.G., a 'create command' like this >\\server\bkp_dir\@-#-%.exe could be used. Option SpecificationYou can switch on or off the following options. Note: these are the same options available from the Options menu. You can switch options on or off at any time in the script file. Options are controlled by a single letter in an option string. option strings that start with a + switch options on, options strings that start with a - switch options off. E.G. the following string switch off verification mode and compression -vz, and this string switches on Project Backup mode +p. The following table show the letter that controls the option. (the letter can be upper or lower case)
A Note On Setup Mode (option S)Selecting this mode allows a setup program to be automatically executed after the archive has been extracted. If the mode is selected from the menu, you will be prompted for the required information when the archive is created. If you are using a script, you must use the : directive 5 times to set the company, product, description,setup program and wait-for program.A Note On Flatten folder hierarchy mode (option F)This mode is available when creating and extracting archives. If this mode is selected when creating an archive, files are stored on the archive without their full pathname, i.e. the filename only is stored. (Beware, if 2 files have the same filename, but different pathnames, SXAzip will see them as the same file, and not let you add the second to the archive (it is not permitted to have 2 files with the same pathname on an archive). To avoid this, you may rename the file as it appears on the archive - when the file is extracted it will then have this new name ). If an archive is stored without flattening the hierarchy, the hierarchy can still be flattened during the extraction (by checking the flatten box on the browse dialog), in which case all files will be created in the specified directory regardless of the pathname on the archive. NB: flattening files during extract is not an option for setup archives since the setup program must know in advance where all files will be located - you may find it easiest to write a setup program if the files are extracted to a single directory and the setup program can then place the files in their correct location - you can use the Flatten mode on archive creation to ensure this happens. See the setup example script bellow.A Note on Minimize Mode (option M) Minimize the size of the output archive. This is done by reducing the
functionality of the User Interface that is embedded in the output archive.
If you are producing setup archives you will certainly want to do this,
as the User interface is not greatly used in such archives. For other archives,
you can choose. This option saves about 40K in the size of the archive
at the cost of a slightly reduced user interface - you don't get popup
menus (a double click will view the current item and F3 will
initiate a search), there is no file-system browse facility, and you only
get the file-name displayed in the list window.
Automation InterfaceObject Name: SXAzip.ArchiveMethod Specification: [id(1)] boolean CreateArchive(BSTR outputPath);
The function of methods should be self explanatory. NB: the SetOptions() method accepts the same format string as used in the script file, i.e. a string starting with + or - followed by a set of single-letter option flags. A type library is also included in the installation. The SetPassword() method has a dual function: when creating an archive is sets the password protection/encryption mode, and when extracting password protected archives, it sets the password to use. The password must be at least 4 characters long. The SetExtractionOverwriteMode() method will accept 3 values...
Setup Archive ExampleThe following script is the one actually used to build the archive used to distribute SXAzip itself. It uses InstallScript (also available from Octatec) to do the actual installation. The script is highly commented, but don't let that make you think SXAzip scripts are complex, they aren't, they are little more than a list of files.NOTE: If you are using InstallScript, you don't actually need to worry about creating the SXAzip script, the InstallScript Wizard (ISBuilder) will do that for you. # SXAzip Setup Archive - FULL VERSION |