| HOME | DEMO | PAYROLL | BUY NOW |
| SBledger (c) 2001, 2002 Octatec Ltd | |
Contents
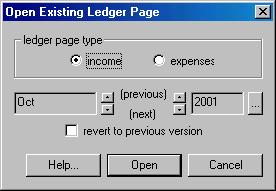
IntroductionSBledger is a simple to use Ledger Maintenance program designed to record the daily Income and Expense Items of a small business. It's main feature is its ability produce VAT reports in a form that matches the quarterly return, so all you have to do is copy the number from the application onto the VAT form. Entering VAT amounts in the ledger is easy as all you need to do is enter the gross amount and then press Ctrl+F (or take the 'Fill In Vat Column' menu option) and its done automatically; once a VAT amount has been defined, if you modify either the Gross, Net or VAT Rate, the figures are automatically re-calculated. It will also produce Profit&Loss reports on an annual basis in summary or month-by-month format.The Ledger is quite similar to a spread sheet, so you may be asking, why don't I just use a spread sheet. Well, you can if that's what you want - you will have to program the calculations (not that difficult, maybe) and the report generation (a bit more tricky, maybe) , and the intra-month search facility (also quite tricky) yourself. The point is, that with SBledger, that's all done for you, and the low cost of the application should mean it isn't really worth your effort to do it yourself. SBledger is closely integrated with SBpayroll. If you have SBpayroll installed, you can easily configure it to automatically send payment amounts to SBledger. Getting StartedWhen you start SBledger for the first time, the Page Open dialog will be displayed and you can open your first page. Enter the Month, Year and Expense/Income Indication.
You can call the Page Open dialog from the File/Open menu to open any page you want, but you will probably find it more convenient to use PageUp(previous page), PageDown(next page) and F1(toggle income and expenses page) to move between pages. (There are tool-bar buttons that also perform this function) On this dialog, as others that include a date control, the two small buttons move the date backwards and forward, the up arrow moves backwards and the down arrow moves forwards. The brows button (…) at the right displays a calendar from which you can pick the date. Note: Whenever a page is saved, the previous version is also
saved.
You can revert to the previous version by checking the revert box on
the
open dialog (it will not be enabled if there is no previous version).
NB:
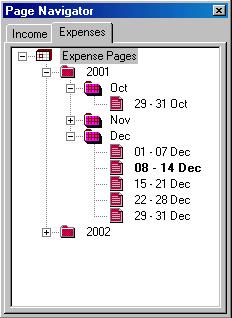
only one previous version is maintained. The Page Navigator and Navigation Keys.These two images show the Page Navigator displaying Income Pages when in Month-Per-Page mode (the default) and Expense Pages when in Week-Per-Page mode
When you start the application for the first time, the Page Navigator Window will be ‘docked’ in the left part of the screen. You can leave it there, dock it in the top, bottom or right, or let it ‘float’ – probably near the bottom. The first tool-bar button will hide or re-show the page navigator. You can also make the page navigator appear as a modeless dialog box rather than a dockable/floating window from the Options menu. Open pages are displayed in bold. You can open pages by double clicking the item.When the Navigator is displaying as a dockable/floating window, if you right-click an item you will see a popup context menu that allows you to open or delete the page or create new pages. NB: the 2nd toolbar button also lets you create new pages. The PageUp/PageDown keys provide and alternative way of moving to the previous(page-up) or next(page-down). The F1 key will show you the ‘complementary’ page, e.g. if you are viewing the Expenses Page for Jan, press F1 and the Income Page for Jan will be opened. Using SBledger
The columns are colour coded and fall into 4 groups. (You can , of course have as many or s few columns as you wish, and call them whatever you want) Income Columns
Expense Columns
Alternatively, you could enter a Net value and press Ctrl+F to automatically fill in the Bank value. If your expense or income item doesn't contain Vat, just enter the same value in a Bank and Net column. NB: pressing Ctrl+F on a cell when vat is present in the row will reverse the effect, i.e. it will remove the vat element. The amount entered in the Bank column (to the left of the vat columns) must balance with the amount entered in the Vat column and an amount entered in a Net column (The vat column can, of course be empty). The application will enforce this relationship and not let you save pages that contain un-balanced rows. That is really all there is to it. If you enter the correct figures in the ledger, you will not have to worry about calculating your VAT again. An of course, if you keep a well maintained ledger, it should make your accountants life much easier as well. You can add as many Bank and Net columns as you wish, rename them and delete them, but you must have at least one of each. The ID and Reference columnsThe ID column on the Income page should be your Invoice Number, and on the Expenses page it should be a Receipt ID - a number you choose which you then write on your receipt which you then file away. The application will generate IDs for you (different IDs for Income and Expenses pages), or you can just make up your own.The Reference column can be deleted if you don't want to use it (and re-added if you change your mind). This column can be used to enter bank-references, e.g. at the end of each month, take your bank statement and enter the reference relating to the item in the reference column. If you do this, it will probably make your accountants life even easier, which should result in a smaller accountancy bill for you. The Notes ColumnThis column just indicates if notes are present for the item. Notes can be added if there are particular circumstances surrounding the transaction that need to be recorded. They are added via the right-hand button context menu.Columns In DetailThe Four Description ColumnsThese four columns are essentially optional. Maintaining them will make it easier to see what items in the ledger actually refer to, but they are not needed for the reports.Description or Item This should be just a simple description of the item. This column cannot be deleted. This is the Invoice Number that you raised for the sale or a receipt number you allocate your self and write on the receipt. The Tools menu gives you help in generating a unique Ids which are maintained separately for income and expenses pages and can be used as your Invoice number if you wish (of course you can use what ever number or letters you wish in this field). If you type Ctrl+Q a unique ID will be generated and pasted into the current cell - the IDs generated in this way continue to increase in value until they are manual reset. This column cannot be deleted Bank Ref This column allows you to enter the bank reference of the item, e.g. cheque/transaction number or credit transaction reference. It is juts to make it easier to tie up bank statements with ledger items. You could enter these each month by referring to your bank statement for that month. If you do not wish to record the Bank Ref, you may delete column. Date This is the date of the transaction. This column cannot be
deleted. The Bank and Private Expenses Cash Columns
This column records the gross amount of the expense. You can delete rename and add more bank columns, but the system will insist that at least one is present Private Cash If you pay for the expense item from your private cash and then reclaim the expense later you can record that in this column. Only one Private Cash column is permitted. The best way to record Private Cash items is to keep
them together
in rows next to each other. Filling out the VAT and Expense column as
you
go. Then, after they have all been entered, on the row below, use the
right-hand
context menu to define a sub-total cell, and do the same under the vat
column. Enter the description as 'reimbursement'. Sub-total
cells are displayed using a bold-font and can be entered anywhere
on
the gird. (Sub-total cells are not included in reports, and hence they
do not get double-counted - as would be the case if you just summed the
value your self and entered it) The Bank Income ColumnsThis column records the gross amount of the income item (e.g. invoice). You can delete rename and add more bank columns, but the system will insist that at least one is present.Vat ColumnThis is the amount of VAT present in the gross (bank column) amount, i.e. the amount of vat charged to you by your suppliers (for expenses) and the amount of vat you add on to your invoices (or income)To calculate the VAT, select either a bank column or an
expense column
and take the left-button context menu item Fill Vat Column (or press Ctrl+F).
NB: the vat column is not editable, however, you can set the vat-rate column on a per-row basis if you need to enter amounts with differing vat rates. Only one VAT column is permitted, and it cannot be deleted or
renamed. Vat RateThis is the VAT rate used when vat is calculated using the using the left-button context menu. You can change this to any rate you want, but if blank, the system-default vat-rate is used (you can change this from the File menu)To calculate select either a bank column or an expense column and take the left-button context menu item Fill Vat Column Only one Vat Rate column is permitted, and it cannot be
renamed or deleted. Expense and Income Item ColumnsThese columns record the expense or income amount, excluding vat. They can be renamed, deleted, or new columns of the same type can be added.Supplies to EU countries and Inputs(acquisitions) from EU countriesVat on supplies to EU countries will probably not be chargeable by you, provided your customer is registered for VAT - however NOTE: there are exceptions to this and so you should check with your local VAT office.Vat on inputs (acquisitions) from the EU will not have been charged by your supplier, but will be due to be paid by you to the government – but the Vat will then become an Input tax and can be offset against you output tax. To take account of this, you can designate a column
to be a source of EU inputs or a destination for EU supplies. Such
columns are displayed with either red or blue text. Recording Expenses incurred personally and reclaimed from the company
You may find that it is more convenient to buy some items for the company from your personal cash and claim re-imbursements later. It is always cleaner if you can avoid this, maybe using a company credit or debit card, but if you can't, this is the way we recommend you record this in the ledger. Enter the expenses just as normal, put the gross amount in the private cash column and them use Ctrl+F to fill the vat column and the sundries column. If there is a more appropriate net expense column than sundries use Cut and Paste (Ctrl+X, Ctrl+C) to move the amount from the sundries column to the preferred column. Enter all personal expense items in this way. Once all items are entered, place the cursor in the personal expense column of the row bellow and take the right hand context menu Define Sub Total Cell menu option. Then enter ‘reimbursement’ in the description. If you have more than one business bank account , place a check make in the business bank column to indicate which bank the reimbursement actually came from. (use the right hand context Add Check Mark menu option to do this - NB you will only be able to add a check mark if you have a sub-total defined in the 'private-cash' column) Adding Deleting and Renaming ColumnsIf you right click the column heading you will get a context menu Allowing you to delete, add rename columns, and also offering help on the particular column clicked.Not all columns can be deleted, in particular at least one
bank and
one expenses column is required. The Description, ID,date,vat
rate, and VAT and notes column cannot be deleted.
Also
columns cannot be inserted at all positions. The vat and vatrate
columns always remain together and the notes column is always
the last on the grid. Password ProtectionYou can set up the application so that it requires a password to start, thus preventing unauthorized access to your data. To do this, close all open forms and take the File/Enable Password Protection option. You will then see a dialog, check the ‘enable password protect’ check-box and you will then be able to choose a password. Once you have done this you will be required to enter the password whenever you start the application. (do not forget your password or you will have extreme difficulty accessing your data).ReportsThese reports are available from the Tools menu and the toolbar
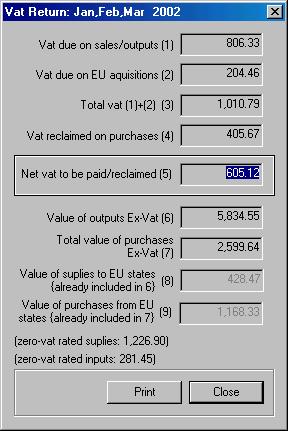
VAT Return
Vat Calculation Log After running a this
dialog, you get the opportunity to view the Vat
Calculation Log, this shows
in detail what figures went into the Vat Return,
and could be very useful for your accountant of vat inspections. You
are strongly recommended
to print
the
calculation log an keep it.
NOTE: current versions of SBLedger have a View
Calculation Log button on this dialog Excluding columns from the VAT report You can exclude an expense or income column from the VAT report. If you do this, you will not be able to add VAT amounts to rows that contain amounts in VAT excluded columns. NOTE: excluding a column is not the same as entering zero vat rated items or vat exempt items. If you purchase vat exempt or zero rated vat items (inputs) or supply zero rated or vat exempt items (supplies) you should still include these amounts on the VAT return even though no VAT arises because of them. if you exclude a column, it will automatically never contain a VAT element and, importantly, will NOT be included in the VAT report – this is really just a reporting issue, since you cannot exclude columns that have VAT amounts associated with them, it won't affect the amount of VAT due. If you want to exclude a column, you should check with your local VAT office first, to determine if it should be included in the VAT report or not. Vat-Excluded columns are shown in a different colour. One reason you might want to exclude a column from the Vat Report is if you make an internal transfer between your bank accounts and record this in the ledger, such a transaction should not be included in the Vat reports. The system, by default, excludes the following expenses columns from the VAT report: PAYE/Corp-TAX, Salary, Dividend, Quarterly Vat Payments. To exclude (or re-include) a column, right-click the column heading and take the Exclude Column From VAT Reports option. NB: Zero rated or vat exempt inputs and supplies (i.e. items that don't have a vat element) are still included in the totals for inputs and supplies in the VAT report. The only way to exclude such items it to enter them in columns that have been explicitly excluded from the Vat Report. Check with your local VAT office before you exclude anything. Treatment of VAT for purchases(inputs) from EU countries. If you purchase goods (inputs) from other EU countries, you will not be charged VAT on the items as you would be if you bought them in the U.K., but VAT may still be due on them and must be paid to Customs and Excise (see box 2 on the VAT return). Of course, just like domestic purchases, the item could be zero or non-vat rated, check with your local Vat office. NOTE: Such VAT charges that are due on EU inputs are also, of course, offset against VAT collected on supplies. Thus the net effect of VAT on EU aquisitions(inputs) is Nil. I.E. the E.U. vat amount is added to the Vat due to the government because it hasn't been paid yet, but can be reclaimed from the government because it is an input VAT tax. There may seem little point in recording it at all, but it is required information on the VAT return. The application supports this by allowing you to designate a column as a EU input (or indeed output) source. The chief difference of such columns is that the NET item entered must be the same as the GROSS item in the ‘balancing’ bank column and the VAT is treated as a debt that is owed to Customs and Excise. Such columns are also used to calculate the NET amount entered into box 9 on the VAT return. If you press Ctrl+F while the NET or GROSS amount is selected, the correct VAT amount will be automatically filled in. To designate a column as a source of EU inputs or a destination for EU supplies, right click the column heading and take the Identify column as an EU input (on Expense pages) or Identify column as an EU supply (on Income pages). Columns identified as EU inputs are displayed using red text, and columns identified as EU supplies are displayed using blue text. Treatment of VAT for supplies to EU countries Normally, you will not charge VAT on goods supplied to EU countries, but the application does not enforce or check this, because in certain cases you will need to charge vat; one of these cases is the supply of services rather than goods, but you should check with your local VAT office to see if you need to charge VAT or not. In any event, you should designate an Income column as a EU supply destination. In this case any VAT is calculated in the normal way, the designation just allows the NET Amount to be calculated for box 8 on the VAT return. Changing your VAT Payment Period When you select the Tools/Vat Return or
the Tools/Vat
Month-by-Month summary, you will have the opportunity to choose the
vat period you want to calculate, by default, it will be the period
just
ended. The vat periods are quarterly and by default start in January If
your vat period starts from a different month, you can use the ‘arrow
icon’
on this dialog to change the start month of the period.
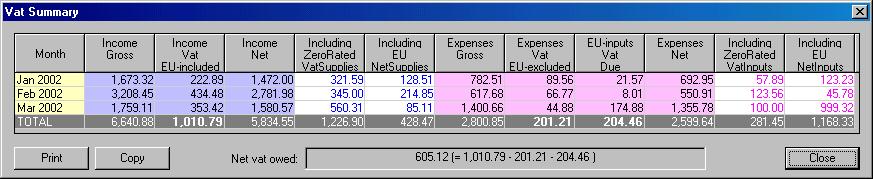
Links for information relating to VAT... General Customs&Excise VAT Specific Customs&Excise page VAT Month-By-Month SummaryThis report displays the Month-By-Month VAT position for a given 3 month reporting period.
Income Gross: The gross
income. Including ZeroRatedVatSupplies:
the total of any supplies made without adding VAT, this figure is
already
included in the Income NET column. Expenses Gross: The gross
amount
of inputs. Including ZeroRated VatInputs:
The
value of any Zero VAT Rated inputs, this figure is already included in
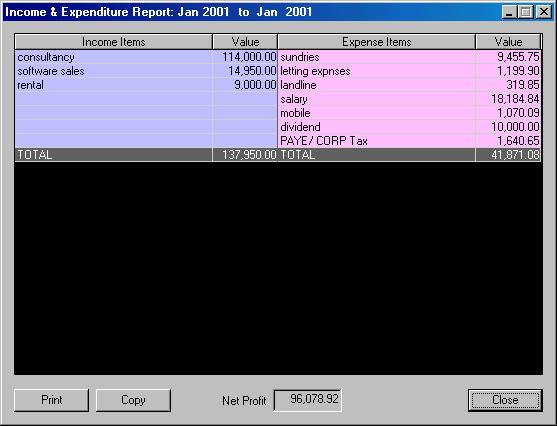
the Expenses Net column. Income & ExpenditureThis report display the Income and Expenditure for a given period – you will probably want to see this for your financial year. Columns on the Income and Expenses pages become rows on this report.
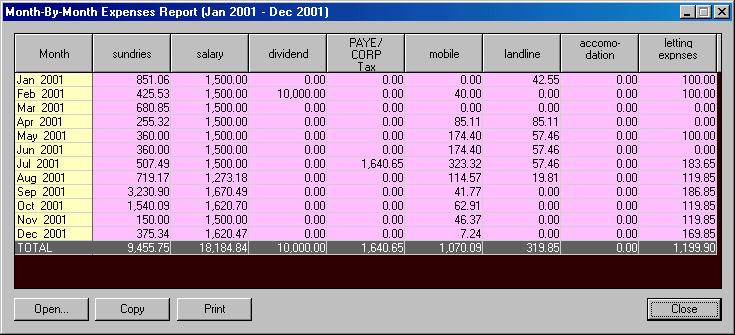
Expenditure - Month-by-MonthThis report display the Expenses for a given period on a month by month basis. I.e. this report displays the column-totals for each month in the period
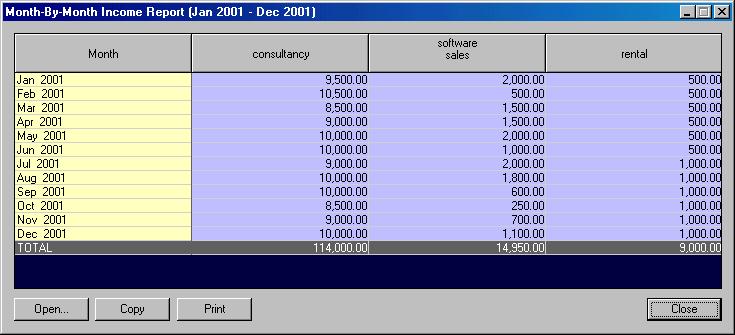
Income - Month-By-MonthThis report display the Income for a given period on a month by month basis. I.e. this report displays the column-totals for each month in the period
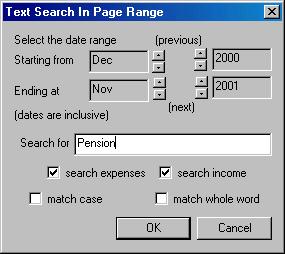
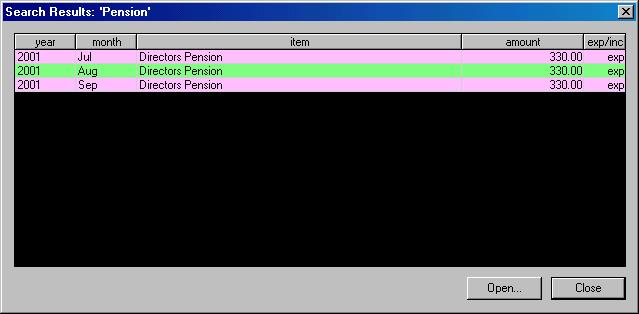
Vat Exception ReportThis report list all items on Income and Expenses pages that don't have a VAT element. This report is actually available from the Tools/Search menu as it is really a search for rows without vat elements, the results are display in search format.Entering Notional Vat AmountsFrom the Right-Hand Mouse-Button Context menu, you can mark any Income row as a Notional Vat Row. In this case the row will be used in Vat Reports, but it will not be used in any other reports, nor will the row be added into the Total at the bottom of the page. The purpose of this can be illustrated by the following scenario. Imagine you are accepting credit card payments via a 3rd party payment processor, and further imagine this is a foreign organizations, maybe PayPal or ClickBank. In this case, the third party payment processor will hold onto the income from your sales in foreign currency (probably US Dollars) until you actually transfer the proceeds of your sales to your account – you mat not do this all that often to reduce currency conversion and transfer costs, you certainly don’t do it after each sale. However, you have a problem – if any of the sales are to companies or individuals based in the EU, you must account for vat at the time of the sale, (using whatever exchange rate is prevalent at the time), but no money has actually entered your bank account(s), so you shouldn’t record this in the ledger. The way round this is to enter the transaction (converted into sterling) into the ledger as a Notional Vat Amount. This amount is then included in the Vat calculations, but does not show on Page Totals or any other report. Such notional amounts are shown in an Italic font so they are distinguishable from a print-out, they are automatically prefixed with ‘NVAT:’ in the description column and if you have not deleted the ‘ref’ column, this is filled in with ‘N.VAT’ in order to make it as clear as possible that this is a Notional Vat Amount and is not included in the column totals.When you eventually transfer the funds to your own account, you should enter the amounts in a column that is Excluded from Vat Reports so that your Gross Sales figure does not double count the Notional Vat items. Excluding Rows from ReportsYou can exclude any row from the reporting systems, i.e. such a row will not appear in the profit&loss or VAT reports. It is also excluded form the page totals (and any sub-totals).You might want to do this if you are recording an item that has been recorded once already, e.g. to record the transfer of amounts between bank accounts, Note: you cannot excluded rows that contain a VAT element, nor can you add a vat element to rows that are exclude from reports. You can do this using the Right-Hand Mouse-Button Context menu,Rows that excluded do not need to balance in the usual bank/net+vat, so you could record the movement of funds between 2 bank accounts by adding 2 entries one positive and one negative. Excluded rows are shown using an italic font, and are automatically prefixed with "X:" in the description column. SearchesThese searches are available from the Tools/Search menu. The search is defined using the following dialog, slightly different versions are displayed for each search type.
The following types of search can be made
This search is limited to the currently active page, the remaining searches work on a range of pages specified in the above dialog This is also called the Vat Exception Report The whole page is searched for the specified text The ID and Bank Reference columns are searched The numeric columns are searched for the given value, you can specify less-than, equal-to, or greater-than The user-notes are searched for the specified text. Columns can be marked as EU supplies or inputs. Columns can be marked as Excluded from VAT reports.
Monthly Or Weekly ModeSBpayroll is fundamentally monthly oriented. under the default mode of operation, one ledger page cover one month. However if you have a lot of transactions in a month, this may make one page excessively large and difficult to read. For this reason you can set week-per-page (more accurately seven-days-per-page) mode. To do this close all open pages and take the View/Weekly or Monthly menu option.In week-per-page mode, the month is spread across 5 ledger pages, each one (except the last) containing 7 days, the last will contain 1 2 or 3 days depending on the month and year. (only 4 pages are used for normal Februarys, of course). The dates of the pages are always 1 – 7, 8 – 14, 15 – 21, 22 – 28 and 29 onwards. This is true regardless of what days-of-the week the 1st day of the month is. Hence this is more properly called seven-day-per-page mode. When operating in this mode, you will find the Page Navigator a particularly useful way to browse pages. Linking SBpayroll To SBledgerIf you have SBpayroll installed, you can configure it to send payment amounts to SBledger when a row is ‘marked as paid’You do this from the SBpayroll application as follows. Close all employees and take the File/Configure External Interfaces menu option. NB release 2.1 or higher of SBpayroll is required to take advantage of this functionality. This menu option displays the Configure External Interfaces dialog box. If the Send to SBledger box is checked, whenever you mark a payment as paid SBledger is started (if it is not already running); an expenses page that matches today's date is opened and a salary item containing the correct value is created. You can decide what ‘bank’ and ‘expense’ columns in SBledger are actually filled in, but probably, the default values for these will be what you want. (If you do change these, the names you enter here need not be an exact match to a column name, they just need to appear somewhere in the column name ) Calculator, Memo Pad and Work PadThese 3 utilities are available from the Tools menu. The Calculator gives you a simple way of entering (and saving) simple calculations, The calculator has 6 memories which are automatically saved for you. The memo pad has 6 pages which are also automatically saved. You can use the memo pad for short notes – you can arrange for the memo pad to be displayed when the application starts up to remind you of any tasks you need to perform. The Work Pad has 12 pages of credit/debit tables into which you can add temporary items. The left side represents credits and the right side represents debits. At the bottom of the page the balance is displayed.Program OptionsThese options are available from the Options menu command.Close current window on 'prev/next' Edit Notes On Cell Entry Enable Coloured Cells Select Text On Cell Edit Enable Row Selection Mark Show Page Navigation as Dockable Bar Include Vat Collections/Payments on Month-By-Monthy Reports
Toolbar ButtonsPage Navigator cut cell undo prev page fill insert vat return search SBpayroll open copy cell redo next page vat delete p+l report multiple Calculator save paste cell undo line toggle monthly p+l search save all The Page Navigator: A convenient way to browse ledger
pages Cut Cell, Copy Cell, Paste Cell: these commands work on the current cell and behave in the standard windows manner Undo, Redo: these commands work on cells – only
actual
typed changes can be undone or redone Prev Page, next page: open the previous or next
page –
if the page doesn't exist you will be asked if you want to create it. Fill Vat: This is only active if the current cell is a Bank or Expenses cell, if you click this button the Vat amount is filled in if it is not present, or removed if it is.(This is the same as pressing Ctrl+F) Insert: insert a a line below the current line Vat return: display a vat
return
report Search: search for text in the
current
page Run SBpayroll Keyboard ShortcutsPageUp: open the previous page – if the page doesn't exist you will be asked if you want to create it.PageDown: open the next page – if the page doesn't exist you will be asked if you want to create it. Insert: insert row above F1: toggle between the Income and Expenses page Ctrl+F1: toggle ‘Close current window on prev/next' Under normal circumstance the PageUp/PageDown command will keep the current window open, with this option set, the current window will be close before a new one is opened F2: display the calculator dialog F3: page search F5: redraw F9: force recalculation of the grid F11: Display the work pad F12: display the memo pad. Ctrl+F: fill (or un-fill) the VAT column Ctrl+C, Ctrl+X, Ctrl+V: copy, cut, paste the selected cell. Alt+C, Alt+X, Alt+V: copy, cut, paste the selected row. Ctrl+O: open Ctrl+S: save Ctrl+P: Print current ledger page Ctrl+N: edit user notes Ctrl+Q: fill the current cell with the next Unique ID Import From / Export To ExcelAll the data grids that are displayed can easily be exported to Excel or any other spread sheet in the form of a .CSV file. This is achieved by simple menu options or dialog buttons. Also, all the grid displays can be copied to the clipboard in a format that can be directly pasted into Excel. You may find exporting ledger pages to .CSV files a useful alternative to printing when passing information to your accountant, to further allow electronic sharing of SBledger pages, the notes associated with each page can be exported as .TXT files.CSV files can be imported into either the Income or Expenses ledger pages. A sophisticated, yet intuitive and easy to use column mapper allows you to specify which CSV file column goes into which Ledger column – this mapping is preserved for future imports. Excluded rows (and also sub-total rows) can be excluded from the Excel/CSV export using the Options/Export To CSV menu option, by default. When included, entries in Report-Excluded rows are surrounded
by angled
brackets and entries in sub-total rows are surrounded by square
brackets
when exported to Excel/CSV files. (These markings are used because
font-information
cannot be recorded in a CSV file, if you print pages that contain
report-excluded
or sub-total rows, they will be printed in the appropriate font. Menu StructureRight Hand Button Context MenuIf you click the right-hand button on a cell, you will see the following menu, some items will only be present depending on the state/type of the cell
If the row contains a sub-total cell in the private cash column, you can set a check-mark in one of the Bank columns to indicate that the private cash expenses were reimbursed from a particular bank account (particularly useful when you have more than one) if the mark already exists, this menu option will be come ‘remove check mark’ This option will fill the vat column and a Bank or Expenses column depending on which cell is selected. If a notes column is selected, this menu option will not appear. If the vat column contains an entry, this option will become ‘UnFill Vat Column’ You can use this to create (or remove) a sub total cell This option allows user notes to be added, edited or deleted. Column Heading Right Hand Button Context MenuIf you click the right-hand button on a column heading you see the following menu, not all items will be present, depending on which column you click
Page Navigator Right Hand Button Context Menu
NOTE: This is the only way to delete a page. Pages deleted in this way are actually placed in the system recycle bin. Main Menu
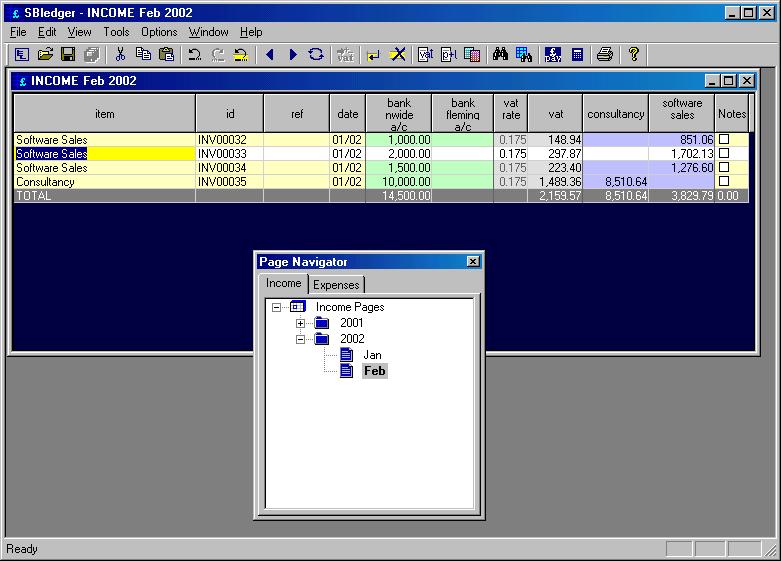
This menu option either fills the Net(Expense) and Vat or Gross(Bank) and Vat columns depending on the current column – the options is only available if the current column contains a value is and a Bank(gross) or Expense(net) column. Each row can have notes attached, this option allows the notes to be edited. Open the previous page. You can configure this option to close the current page or leave it open. If the previous page does not exists, you will be asked if you want to create it or not. Open the next page. You can configure this option to close the current page or leave it open. If the next page does not exists, you will be asked if you want to create it or not. If you are displaying the Expenses Page for a given month, the Income Page is displayed and vice versa. If the page is not open it will be opened for you. If the page does not exists, you will be asked if you want to create it. fill the current cell with the next Unique ID, A different ID is allocated for expense pages and income pages. A new ID is allocated and placed on the clipboard. A different ID is allocated for expense pages and income pages. The current ‘next ID value’ is decremented by one. The unique ID (expense or income depending on the current page) is reset to 1 Start SBpayroll (if it is installed on your computer). Screen ShotThis shows the application displaying an Income Page with the Page Navigator ‘floating’ near the bottom of the screen.
Data BackupsIf your system suffers hardware failure, or you accidentally delete parts of your system, you will loose your data. You should save your data in backups in order to protect yourself from this eventuality. There are many possible ways to backup your data, copying to floppy disks is one possibility. To backup your SBledger data you should copy all files under <InstallationDir>\SBledger\1.00 to a floppy disk. <InstallationDir> is the directory where you installed SBledger, a typlical installation directory is C:\Program Files\Octatec\SBledger\1.00 |
|||||||||